The Stick Sandwich Candlestick Pattern + Chart Examples

stick sandwich candlestick patterns banner

Candlestick patterns have been around for centuries. They are very useful in finding reversals and continuation patterns on charts. While we discuss them in detail in other posts, in this post we will focus on the stick sandwich pattern.

Stick Sandwich Definition

The stick sandwich candlestick pattern can occur in both bull and bear markets or intraday. The pattern consists of three candlesticks, where one candlestick has an opposite colored candlestick on both sides. The closing prices of the two candlesticks that surround the opposite colored candlestick must be same.

Think of it this way: it’s like an engulfing candle that gets reversed yet again.

Bearish Stick Sandwich Charting Example

The bearish stick sandwich is a rare candlestick pattern. Despite its name, it isn’t a bearish pattern. It simply means the bearish engulfing candle gets sandwiched.

The first candlestick in the formation is a long white (green) candlestick that closes near its high. The second candlestick is a black (red) candlestick that gaps down from the previous close and closes below the previous day’s open. The third candlestick is a white (green) candlestick that completely engulfs the second candlestick and has the same closing price as the first candlestick.

Bearish Stick Sandwich

Notice how the bearish engulfing candle in the middle is sandwiched on either side by bullish candles, and eventually continues trend upwards. Traders should wait for the low of the third candlestick to be broken prior to taking any short positions.

Bullish Stick Sandwich Charting Example

Like the example above, the bullish stick sandwich is not actually bullish. It is bearish.

The bullish stick sandwich is a rare candlestick pattern. The first candlestick in the formation is a long black (red) candlestick that closes near its low. The second candlestick is a white (green) candlestick that gaps up from the previous close and closes above the previous day’s open. The third candlestick is a black (red) candlestick that completely engulfs the second candlestick and has the same closing price as the first candlestick.

Bullish Stick Sandwich

Traders should wait for the high of the third candlestick to be broken in the bullish stick sandwich formation prior to taking any long positions.

Examples of Stick Sandwich Chart Pattern

Let us now review real-life chart examples of the stick sandwich candlestick pattern.  Again, the stick sandwich can have a bearish or bullish characteristic.

Bullish Engulfing Stick Sandwich Candlestick Pattern

Bullish stick sandwich pattern
Bullish Engulfing Stick Sandwich Candlestick Pattern

This is the 5-minute chart of AAPL from January of 2022. In the blue circle, you see the bullish candlestick being engulfed by two bearish sticks.

The first candle of the pattern is bearish and closes near its low. Next, a bullish candle develops with a small gap and closes above the first candle of the pattern.

The third candle is bearish and fully engulfs the bullish candle. The last sign of the bullish engulfing stick sandwich is that the third candle closes near the closing price of the first candle. or lower.

After the pattern completes, the price reverses sharply to the downside over the next couple of minutes.

Bearish Engulfing Stick Sandwich Candlestick Pattern

Bearish Engulfing Stick Sandwich Candlestick Pattern

This is the 5-minute chart of TSLA from January 2022.

After a price decrease, TSLA begins to form a bearish engulfiing stick sandwich candlestick pattern.

The first bullish candle closes near its high. Then the second candle is bearish, gaps down from the previous candle, and closes near the bottom of its range.

The third and final candlestick almost engulfs the second candlestick and closes near the closing price of the first candle of the pattern. The final candle launches the reversal, as you can see.

After the confirmation of the pattern, the stock begins an impulsive move higher, resulting in a $30 increase.

How to Manage Risk when Trading the Stick Sandwich Pattern

Now that you can recognize the stick sandwich candlestick pattern on the chart, let us now cover a few methods for how to manage risks when trading the pattern.

How Much Should You Risk?

There is a common saying that equity traders should not risk more than 2 to 3% of their capital in a single trade We believe this is a wise approach to risk management.

Now, if we use the premise of a maximum drawdown per trade of 1% with a success rate of 20%, what would be the results?

  • Imagine you have a bankroll of $10,000 and instead of risking 3%, you only risk 1% of your capital per day trade; this means that a single trade could result in a maximum loss of $100.
  • You use a trading strategy, which gives you a 20% success rate, which is 1:5 ratio.
  • At the same time, your strategy gives you a 6:1 risk-to-return ratio, or a 6% price target per trade.

Some of you will instantly say “Hey! This system will not work and you will surely lose your bankroll!”

Let us now calculate the results from five consecutive trades using this money management strategy starting with $10,000 in capital.

  • Your first trade is a loser and results in a $100 loss.
  • First, you invest $9,900 in an unsuccessful trade. You lose $99.
  • Next, you invest $9,801 in an unsuccessful trade. You lose $98.01.
  • Then, you invest $9,702.99 in an unsuccessful trade. You lose $97.02.
  • Lastly, you invest $9,605.96 in a winning trade. Your trade is a 6% winner resulting in your account shooting back up to $10,182.32.

This is how a strategy with only a 20% success rate can actually turn into a profitable trading system.

Higher Winning Percentages

Granted, it will be difficult for some people to trade like this. That’s a lot of losing to absorb mentally and emotionally. For some, we to constantly feel the money flowing into our account.  After 4 or 5 consecutive losers, you might become susceptible to bending your rules to account for the losses.

If you suffer from the need to win frequently, then this approach will not work for you.

Now, shifting gears back to our stick sandwich candlestick pattern. Since it is a three-candle formation, it is considered more reliable than the two or one candlestick patterns.

For this reason, it is likely to give you at least a 50% success rate versus the 20% as illustrated above. You of course will need to test out the strategy to find the right level of risk/reward for you, but the math supports the theory that you can turn a profit.

Where to Place a Stop Loss when trading the Stick Sandwich Reversal Patterns

When you trade stick sandwich candlestick formations, you should always use a stop loss. On that token, with any trading system – you must use a stop loss!

No matter how good you think you are, at some point the market will take you for a ride if you let it.

Back to how to place a stop loss with the stick sandwich formation, you should place the order right below the low of the bearish engulfing candlestick pattern and the high of the bullish engulfing candlestick pattern.

Bearish Sandwich Trading Example

This is the same TSLA chart from the previous example, but this time we have placed a stop loss order below the bearish engulfing stick sandwich candlestick pattern.

The great thing about the stick sandwich pattern is that you can keep a tight stop. This way you can increase your risk to reward ratio on each trade.

Taking Profits when trading the Stick Sandwich Reversal Pattern

The suggested price target for the stick sandwich candlestick pattern is three times the size of the formation.

Once the stock has moved three times the size of the formation, there are two simple tactics you can use to take profits:

  • Close a portion of the trade (one-third or half). This way if the price starts moving against you, you have booked profits and limited your downside risk. (On a positive note, if the stock continues higher, you can take advantage of the upside without the stress of carrying the entire position.)
  • Adjust your stop loss order below the low of the candlestick, which hits the price target. Now that you have placed your stop, you can then use a simple moving average or price action to keep you in the trade.

Putting it All Together

Let’s now put it all together to illustrate how to trade the stick sandwich candlestick pattern.

Bullish Stick Sandwich Trading Example

This is the 5-minute chart of TSLA, illustrating a bearish engulfing stick sandwich (highlighted in the blue circle).

The first candlestick in the formation is bullish and closes near its high.  The second candlestick opens with a gap and closes below the first candlestick.

The third candlestick is bullish and nearly engulfs the second candle – closing at approximately the same level of the first candlestick.

Everything looks great based on the requirements of the formation and we go long, with a stop loss order right below the low of the pattern.

TSLA starts moving higher as expected and reaches our price target of three times the formation, 25 minutes after opening the trade.

Once reaching our price target, we adjust our stop loss order below the candle that hit the target.

Notice that the price starts to rollover for a time, but our stop loss remains untouched and TSLA is able to rally higher.

However, we see topping action and a hammer reversal pattern, which implies that this might be the end of the trend. For this reason, we adjust our stop below the hammer candle as shown on the image (Stop 3). We can also close out the position as it is the end of day.

Conclusion

  • The stick sandwich candle pattern is a rare chart occurrence where two candles sandwich another one.
  • The pattern has a reversal characteristic.
  • The sandwich pattern is a rare chart occurrence.
  • When we trade a sandwich candle pattern, we should pursue a minimum profit equal to three times the size of the formation.
  • A stop loss should be placed below the pattern.
  • A proper stick sandwich trading strategy should lead to at least a 3:1 return-to-risk ratio.

To practice this, there is no better way than to search for these patterns in the simulator. Also, be sure to check out our tutorial and cheat sheet on candlestick patterns!

Candlestick Pattern Quick Reference Guide
Volume Candles Banner

Volume candlesticks may sound a bit odd at first. After all, most of us are used to seeing price candlesticks separate from volume bars below on a chart. Perhaps you’ve even tried Volume Profile before, where volume is displayed horizontally? If so, volume candlesticks are simply a combination of volume and price to show the emphasis on the amount of effort that goes into each candle.

What are Volume Candlesticks?

Volume candlesticks are comprised of the following information: open, high, low, close and volume. The one difference from the standard candlestick structure is the obvious volume aspect. The volume then drives the size of the width of the candlestick.

Examples of Volume Candlesticks on the Chart

Volume Candlesticks
Volume Candlesticks

What are some of things that pop out at you when reviewing the above chart?

First, the large size of the candlesticks in the morning. This is something you will consistently see when day trading.

The other thing to note is how you can have small candles right after large ones. These inside bars are moments of reflection where bulls and bears are trying to figure out which way the action will break.

The last thing you will notice is how volume slowly drifted lower into the close on the prior day. Comparing the size of the candles from the prior day to the current day should give you a clear indication that more effort, more shares, were being traded on the current day.

Breakouts with Volume Candlesticks

Breakouts are one of the hardest patterns to trade in the market, but they are also one of the most rewarding in terms of profit potential. The key challenge with breakouts is determining when the breakout is real versus when it’s simply professional traders selling into the hands of other less informed retail traders.

Let’s review a few examples of breakouts and how volume candlesticks can help us dissect the action.

Breakout Example #1

In this first example, we are going to review a breakout to the downside.

Valid Breakdown
Valid Breakdown

In the above chart, notice that when price breaks down it is followed by red candlesticks that are also large and wide. If the second candlestick after the breakout candle was small and unable to go lower, this might be your first sign that a reversal or at least a pause could be around the corner.

Rather, the expanding candles and volume tell us that more downside is likely imminent. After all, we’re simply looking for clues as to the path of least resistance.

Let’s take a look at another valid breakout example.

Breakout Example #2

One of the hardest things to do when day trading is placing trades during the middle of the day. Head fakes and choppiness abound once you get past 10 – 10:30am. The breakout momentum from the opening bell has usually dissipated and moves higher are often where the newbies are stuck holding shares from professionals that have sold off into the morning strength.

That being said, there are times when mid-day or late morning breakouts occur. We discuss these in our discussion of our favorite small account strategy.

Midday Breakout
Midday Breakout

Notice in the example above how the candle breaks through the $6.40 level with a solid white candle after about ten smaller back-and-forth candlesticks.

This large white candle shows you that price was able to break with volume. As the market contracts and expands, volume expansion on a breakout is generally considered positive. This is especially true with follow-through expansion on more than one candle.

Unlike the morning trade where you can buy breakouts almost purely based on price action because you know the volume always comes in, you will need to obsess over volume during the midday in order to increase the odds of your trades working out.

False Breakouts with Volume Candlesticks

Not all breakouts work. That’s an understatement. It will be up to you to study the characteristics of what typically works and what doesn’t. To that end, volume candlesticks can help with your observation of whether or not expansion comes into a breakout.

Failed Breakouts
Failed Breakouts

As you can see in this example, the volume and price do not accompany the breakout. As mentioned earlier, with the midday breakouts you have to be patient and let that first 5-minute bar develop.

The method is simple: if the candle is red on the breakout and the width is small, there is a high likelihood of a reversal coming. We call this failed-follow-through. At this point, your alarms should be going off and shifting from offense to defense.

Trend Continuation with Volume Candlesticks

Another method for using volume candlesticks is to determine when to enter continuation patterns. This is a great method for jumping into a strong trend.

Pullback/Continuation Example

Pullback Volume Candlestick

In this example, FRC had a nice runup in the morning and then formed a doji.  As you can see, the doji was small relative to the large white candle from the opening bell. We call this a retest, when price pulls back to a heavy demand area to see if that demand is still present.

So, how do we set up this trade?

Well, the doji also presents itself after four black crows (I know the candles are red). You want to buy the break of the last red candle with a stop below the doji.

Your profit target is the most recent high, which will give you a 3 to 1 risk reward ratio. Check out the below visual which illustrates this setup.

Pullback Setup - Volume Candlestick
Pullback Setup – Volume Candlestick

For more great tips on how to spot “constructive” or “bullish” pullbacks, be sure to check our recent post on the subject.

Ride the Trend with Volume Candlesticks

Let’s explore how volume candlesticks can potentially help identify when the market is trending hard and when you need to hold on to your position for larger gains.

Riding the Trend
Riding the Trend

In this example, you can see that there are some up candles and when red candles do present themselves, they do so with little volume.

In these scenarios, you want to sit back and let the candles do the hard lifting. We don’t receive a large red candle until near the close, at which point you have already made a sizeable profit.

Strong Uptrend
Strong Uptrend

The market continues to go higher in this next example with a few red candlesticks. Again, the key point is that there are no large red candlesticks showing up on the chart.

Granted a large red candlestick can always show up out of nowhere. for this reason, it is best to keep stops beneath key price levels to ensure you don’t give back gains in minutes that you have been accumulating all day riding a strong wave. You might also consider a trailing stop in this environment.

Conclusion

We really hope this brief tutorial helps you understand not only the significance of volume candlesticks, but also how to trade with them. Like with any indicator on a chart, there is no “perfect” tool for divining the markets. However, with practice, you can find the tools that suit you best as you train your chart eye to read the volume and price action.

How Can Tradingsim Help?

Tradingsim provides the most realistic and user-friendly application for replaying the markets. We also have a large inventory of indicators including volume candlesticks. Here is where to find the volume candles in TradingSim:

Volume Candles in TradingSim

Feel free to test drive the strategies you see in this article and others from around the web, which can help you achieve your trading goals.

To see more on volume candles and candlesticks in general, we recommend Steve Nison’s website.

Shooting Stars

The shooting star is a single bearish candlestick pattern that is common in technical analysis. The candle falls into the “hammer” group and is a first cousin of the – hanging man, hammer, and inverted hammer. If you’re unfamiliar with any of these patterns, check out our Quick Reference Guide.

Our trading expert, Aiman Almansoori describes these patterns and how to trade them in a fantastic webinar. Be sure to follow our YouTube channel to watch more educational content like this.

What is the Shooting Star Candle?

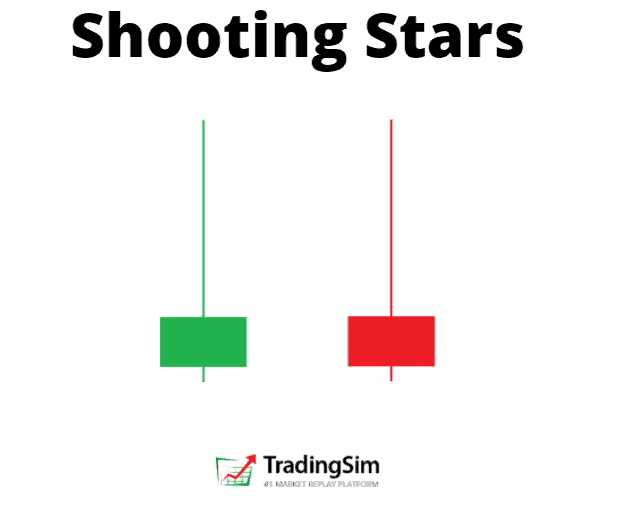
The shooting star has a small body and a very long upper candle wick.

As you see, the candle has a small body located in the lower part of the pattern.

Shooting Star image

However, this also looks like an inverted hammer candle pattern.

So, how can we distinguish the two? The answer to this question is hidden in the price direction before the creation of the candle.

Inverted Hammer

The shooting star candle is a reversal pattern of an upwards price move. The inverted hammer occurs at the end of a down trend.

Shooting Star Confirmation

If a stock is in a bullish uptrend and you identify a shooting star candle, then there is a solid chance that the trend will reverse. For this reason, traders use this candle to enter short trades on the assumption that the bullish move is running out of steam.

shooting star candlestick potential

Once you are able to identify the shooting star, you should look to open a short position on a break of the low of the candle.

The expectation for the profit potential for the shooting star is 3:1 the size of the candlestick.

Here is an example with AMC. Note that we are aiming for 3x the width of the shooting star candle:

AMC bearish candlestick pattern
AMC bearish shooting star candlestick pattern

Psychology of the Pattern

The shooting star candlestick is considered one of the most reliable candlestick patterns. One of the reasons for this is the unique structure – a small body with a high upper candlewick.

The psychology of the trade has many layers of complexity.

First, buyers are enjoying their gains as the stock shoots to a climactic high.  As this euphoric moment begins to set in, short traders begin to sell the stock on a flurry of buy orders.

At this point, the longs who were late to the party begin to get scared and start to sell out as well. This panic long selling and short selling leads to a sharp reversal in the price action, thus generating a small candlestick body on the chart.

It is important to mention that the shooting star candlestick pattern is even more reliable when it develops after three consecutive bullish candles.

This creates exponential bullish pressure on the chart. In other words, exhaustion.

In such cases, the shooting star candle is likely to have an even bigger upper candlewick. This implies that the price is about to reverse with even bigger strength.

3 Steps to Trading the Shooting Star

1)    Trade Entry

Before entering a shooting star trade, you should first confirm the pattern.

Here are handful of criteria to ensure success:

  1. Identify an active bullish trend.
  2. Spot a candle with a small body and a big upper candlewick.
  3. Wait for a bearish candle to break the low point of the shooting star body.
  4. Ensure elevated volume, signifying heavy supply
  5. This will confirm the validity of your shooting star on the chart.

If you are able to identify the presence of these signals, then you should short the security. After all, you are anticipating an upcoming bearish price move.

2)    Stop Loss

You should always use a stop loss order when trading the shooting star candle pattern. After all, nothing is 100% guaranteed in stock trading, and you may experience false signals when trading the shooting star pattern.

For this reason, place the shooting star candle pattern above the upper wick of the pattern.

3)    Taking Profits

The price target for the shooting star is equal to the size of the pattern (the length of the candle).

Similarly, our target is for a price move equal to three times the length of shooting star, including the wick.

Shooting Star Trading Strategy

Now that we have the shooting star confirmation criteria behind us, we will combine these three basic steps into a trading strategy.

Example #1

This is the 2-minute chart of Hewlett-Packard from June 10, 2016. The image illustrates a classical shooting star trading example.

trading strategy
shooting star trading strategy

Our trading analysis starts with identifying that the price is trending upwards.

Suddenly, a shooting star candlestick appears, which is marked with the green circle on the chart. We have a small candle body and a big upper candlewick, which confirms the shape of the pattern.

Entry

The next candle after the shooting star is bearish and it confirms the pattern.

Therefore, we sell the security after the pattern confirmation. At the same time, we place a stop loss order above the upper wick of the shooting star candle in order to secure our short trade.

This way, if the price creates an unexpected bullish move caused by high volatility, we will be protected.

Our maximum loss will be equal to the distance between the level we short HPQ and the level of the stop loss order.

The first blue arrow on the image measures the size of the candlestick. According to our shooting star trading strategy, we should seek a target equal to three times the size of the pattern.

Profits Raining

Thus, we apply the size of the pattern three times starting from the lower candle wick. This is how we get the big blue arrow, which points out the minimum target of our trading strategy.

trading strategy
shooting star trading strategy

In order to maximize our profits, we need to stay in the trade until the price action closes a candle beyond the minimum target.

On the way down, the price creates one correction during the bearish move. The downward activity then resumes and 18 periods after we short HPQ, the price action closes a candle below the minimum target of the pattern.

Exit

Luckily, this candle is relatively big and goes way beyond the minimum target. A perfect opportunity to exit.

As you see, the shooting star candle pattern gives us an indication that the trend might reverse. This creates a nice premise to short HP right in the beginning of an emerging bearish trend. Despite the small correction on the way down, the shooting star reaches the target of three times the size of the candlestick.

Example #2

Let’s now try this strategy one more time on another shooting star trading example:

 trading strategy 2
shooting star trading strategy 2

We now have the 1-minute chart of Apple from December 22, 2015.

The chart starts with a price increase – Apple creates higher highs and higher lows. On the way up, the price action forms a shooting star candlestick pattern on the chart (the green circle on the image).

Now we have a reason to believe that the price action could be reversed. We wait to see if the next candle is going to confirm the authenticity of the shooting star reversal pattern.

Entry

Fortunately, the next candle is bearish and breaks the low of our shooting star candle on the chart. This gives us a strong bearish signal and we short Apple at the end of the bearish candle. At the same time, we place a stop loss order at the highest point of the shooting star – above the upper candlewick.

Now, the trade is protected against rapid price moves contrary to our trade.

Raining Profits

The blue arrows on the image measure and apply three times the size of the shooting star candle pattern.  After we short Apple, the price enters a downtrend.

After the first bearish impulse on the chart, the price creates a range between $107.30 and $107.40 per share. The range is then broken and the price action creates a new bearish impulse on the chart.

This impulse leads the price to complete a total bearish move of three times the size of the shooting star pattern. This is the minimum target for our trade and we close the position.

Another successful trade in the books.

Recap

  • The shooting star falls into the “Hammer” candle family.
  • There are three basic tricks for trading the shooting star candlestick figure:
    • Sell the security after the creation of a bullish trend, a shooting star candle, and a bearish confirmation candle.
    • Put a stop loss right above the upper candlewick of the shooting star figure.
    • Stay in the short trade for a bearish price move equal to at least three times the size of the shooting star candle including the upper and the lower candlewick.
  • This shooting star trading strategy contains around 3:1 Win-Loss ratio.

How to Practice This Strategy

If you find yourself overwhelmed or new to candlestick patterns, the best way to get a firm grasp of the strategies is through deliberate practice.

There is no more efficient way of doing that than in a trading simulator with a realistic trading environment.

To that end, we’ve put together a handful of reference guides for the best bullish and bearish candlestick patterns to help guide you along the way. So, be sure to check those out and download our cheat sheets.

The Harami candlestick pattern is usually considered more of a secondary candlestick pattern. These are not as powerful as the formations we went over in our Candlestick Patterns Explained article; nonetheless, they are important when reading price and volume action.

For a detailed webinar on this pattern and many other powerful candlestick patterns, visit our YouTube tutorial by expert Aiman Almansoori

Like other candlestick patterns, the Harami can signal that a reversal may be at hand. This article will focus on these patterns and how to trade them.

What is a Harami candle

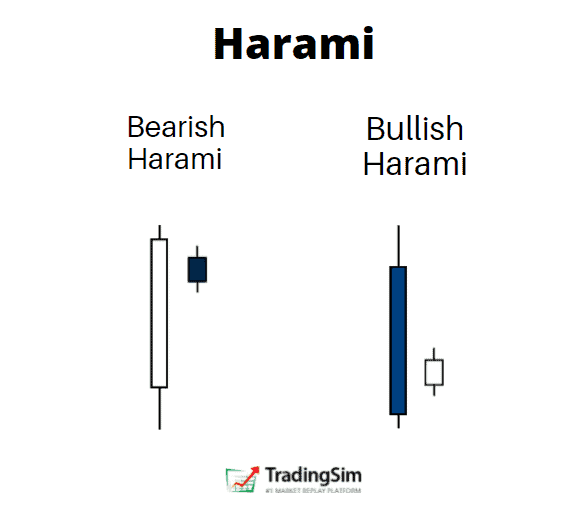
When the harami candlestick pattern appears, it depicts a condition in which the market is losing its steam in the prevailing direction. The harami candlestick pattern consists of a small real body that is contained within the preceding large candles’ real body.

The preceding candle tends to be very large in relation to the other candles around it. This is important.

Bullish and bearish Harami Pattern
Harami

What does a harami tell us about the condition of the market? During a bullish move, the harami candlestick indicator tells us that strength in the previous candle is dissipating.

Bulls who have made gains in the stock may be taking a breather to either accumulate more shares or sell out of their existing positions. The large preceding candle would signify climactic conditions in that regard.

In order to understand this, compare the Harami candle above against the Three White Soldiers below:

Three White Soldier Candle Pattern

The obvious difference here is follow through versus hesitation after that first bar.

An Exception

While the bias of the harami candlestick pattern indicates a reversal, the appearance of a harami formation in day trading can actually be quite bullish if the highs of the bar prior to the harami are broken to the upside.

This would indicate that there was, in fact, buying going on within the harami bar.

Harami Cross

The harami cross is a more powerful version of the harami. It is characterized by having a very small real body almost to the point of being a doji.

Harami Cross
Harami Cross

The smaller the real body, the better for this formation.

The lack of a real body after a strong move in the prior candle tells us with more certainty that the previous trend is coming to an end and that a reversal may be at hand.

Bulls could not continue the upper hand and bears are putting on heavy selling pressure.

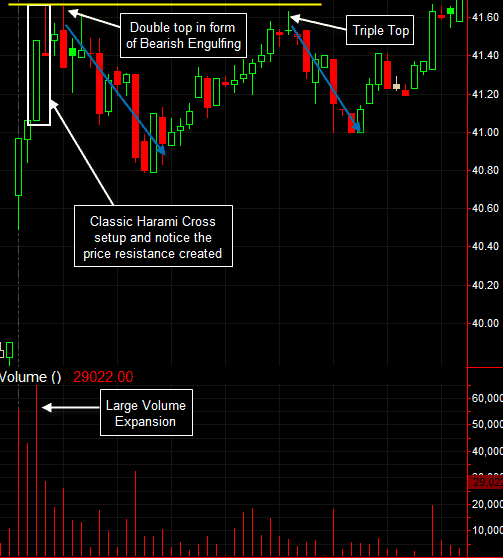
The high or low of a harami cross setup tends to provide resistance or support for any further price moves. Let’s take a look at a simple example that a day trader could have profited handsomely off of.

Harami Cross Example

As you can see, this was a perfect harami cross setup. But the important point was the fact that we saw other candlestick formations confirm what the harami cross was telling us.

Context is everything when interpreting candlestick patterns.

The double top that came in the form of a bearish engulfing candlestick gave us that added confirmation that we really did see a top of some sort.

Later, a triple top came in the form of a shooting star which also led us to believe that we could be in store for yet another pullback.

This is the power of candlesticks and using various methods to confirm each other.

Trading the Harami

Now that we have covered the basics of the harami candlestick pattern, it’s now time to dive into tradeable strategies.  Please note all of the subsequent examples are on a 5-minute time frame, but the rules apply to other time frames just as well.

#1 – Trading Harami with Price Action

Since the harami candlestick pattern is a price action component in itself, we should always include price action analysis in our strategies.

Trading with price action means to rely fully on the price action on the chart. This means: no indicators, no oscillators, no moving averages, etc. You rely solely on chart patterns, candle patterns, support, resistance, and Fibonacci levels.

This is the 5-minute chart of Facebook from Sep 29, 2015. On the chart, you will see many colorful lines illustrating different price action patterns.

Harami + Price Action Trading

The Harami

First, we start with the red circle at the beginning of the chart. This is a 100% Harami candle! Yet, we do not enter the market, because the next set of candles do not validate a reversal.

We get one tiny red candle and the next one is a strong bullish candlestick. However, after the big green candle that follows, we get a second tiny red candle.

Notice how its body is contained by the bigger bullish candle. It is a bearish Harami!

Confirmation

In addition, with the next two red candles we confirm a Three Black Crows candle pattern, shown in the green circle. This is when we sell Facebook short and begin to follow the price action.

Within the orange lines, you will see a consolidation, which looks like a bearish pennant. Suddenly, Facebook’s price breaks the pennant to the downside and thus we continue to hold our short position.

Harami + Price Action Trading

Temporary Resistance

The further decrease in price then creates a bottom, marked with a green line. Then, we see a resistance level develop – the blue line. These are our next support and resistance levels for Facebook.

If the price breaks the support, we hold our position. If the price breaks the resistance, we exit the trade – literally that simple!

The price breaks the green support and we continue holding our short position. The new bottom after the decrease is now marked with a yellow line.

Note that the price retraces to the blue resistance level and then bounces back. Did you notice that we now have two tops on the same line and two bottoms on the same line? This is how we draw our bearish channel.

Capitulation

The price breaks the yellow support in a bearish direction giving us the confidence to hold our short position.

Harami + Price Action Trading

The price then drops to the lower level of the channel and starts to form a bottom. This looks like a regular correction, doesn’t it?

However, the blue lines at the end of the chart show how the price confirms a double bottom pattern. The double bottom is an early indication that price is likely to stabilize and lead to a potential rally.

The Exit

On that token, the next price increase confirms the double bottom pattern and the price closes outside of the downtrend channel, which has held the price down the entire trading day.  At this point, the writing is on the wall and we exit our short position.

This short trade with Facebook brings us a profit of $3.30 per share for about 5 hours of work. What a great trade!

#2 – Trading Harami with a Fast EMA and Fibonacci Levels

This time, we will combine the Harami candle chart pattern with an exponential moving average and Fibonacci levels.

When you spot a Harami candlestick pattern, the key here is to use the moving average to set an entry point.

If the price moves in your favor, follow the retracement with the Fibonacci levels. Similarly, close the position when the price breaks a key Fibonacci support level or when the exponential moving average is broken in the opposite direction of the primary trend.

Harami + Fast EMA + Fibonacci Levels

This is a 5-minute chart of Apple from Nov 19, 2015. I am using a 5-period EMA for this example.

The first black line shows the overall bullish trend. At the top, we spot a bearish Harami candlestick pattern, which leads us to place the Fibonacci levels on the chart.

Confirmation

Two candles later, Apple’s price breaks the 5-period EMA downwards. This is when we go short.

Notice that there is definitely a strong support around the 23.6% Fibonacci level (the shaded red to green area of the chart). However, the price doesn’t close above the EMA with its full body.

For this reason, we hold our trade.

Capitulation and Exit

Eventually, Apple breaks 23.6% and keeps decreasing. A new drop to the 38.2% Fibonacci level appears (the bottom of the green shaded area). This is exactly when we close our position.

The reason for this is that we see a hammer candle after the price touches 38.2%. This gives us a sign to exit the position. Otherwise, we could hold until the price closes above the EMA.

This trade brought us a profit of $.77 cents per share in less than an hour.

#3 – Trading Harami with a Fast Oscillator

Since the Harami is a reversal pattern, we need a way to measure the likelihood of successful signal to reduce the noise. This is where a fast oscillator can be of great assistance in terms of trade validation.

Oscillators Explained

In daytrading, a fast oscillator can give more signals than the slower ones, so focus on these.

If you use the money flow or the price oscillator, the chance to match a Harami with an overbought/oversold signal is minimal. The stochastic oscillator on the other hand is great for trading haramis.

If you have an uptrend and you get a bearish harami candle, try confirming this signal with the stochastic. In this case, you will need an overbought signal from the stochastic.

Confirmation

Once you receive this additional signal, open a trade – a short position in our case. Then you can stay in the market until you get a contrary signal from the oscillator at the other end of the trade.

Let’s now see how this strategy works with the help of the stochastic oscillator:

Harami + Fast Oscillator

This is the 5-minute chart of Citigroup from Nov 19, 2015.

After a steady price increase, a bearish harami develops which is shown in the green circle on the chart. At the same time, the stochastic at the bottom of the chart has already been in the overbought area for about 7 periods.

This gives us a short signal.

Now that we are short Citigroup, we wait for an opposite signal from the stochastic. 5 periods later, the blue stochastic line hops into the oversold area for a moment.

Exit

This is the signal we were waiting for in order to close our trade. We exit the position and collect a profit of $.30 cents per share for 25 minutes of work.

#4 – Trading Harami with Bollinger Bands

In this trading strategy, we will combine the harami with bollinger bands. We will only trade the haramis that form at the outer edges, when the price touches a level of the upper or lower bollinger bands.

Entry & Exit

Once the price touches the upper bollinger band at the same time a harami is formed, open a short position. Likewise, hold the position until the price touches the lower bollinger band.

Harami + Bollinger Bands

This is the 5-minute chart of IBM from Dec 8, 2015.

The first black arrow shows an increase of IBM and price interaction with the upper bollinger band. In the green circle, you see a bearish harami candle.

This gives us a short signal and we open the trade.

We hold our trade until the price meets the lower bollinger band level –closing our position when the price closes the first bullish candle after touching the lower bollinger band level.

This happens 28 periods later, almost 2 hours after we entered the trade. This trade makes us a total profit of $1.07 per share on IBM.

Which strategy is better?

All four strategies are great for trading candlestick reversal patterns like the harami. Yet, according to our in-house trading expert Al Hill, if he had to pick a strategy, he’d prefer trading haramis with bollinger bands.

“I believe that bollinger bands are likely to give you less false signals and keep you in winning trades longer.”

Al Hill

Price action trading is often insufficient for making a trading decision, as it requires years of experience mastering chart patterns.

The EMA plus Fibonacci strategy is strongly profitable, but sometimes the fast EMA could knock you out of a winning trade relatively early.

Although the stochastics are one of the faster oscillators, it might take forever until you match your candle pattern with an overbought/oversold signal.

Consideration

One point to note is that these four trading strategies can be used in combination with all other candlestick reversal patterns.

Therefore, candlestick patterns like doji, hammer, inverted hammer, hanging man, shooting star, morning star, evening star, engulfing, etc. will provide you similar trading results as the harami candlestick pattern.

Be sure to read about these candle patterns and download our free cheat sheet.

Recap

  • The harami candlestick pattern has trend reversal characteristics.
  • We confirm a harami at the end of a trend when a candle’s body fully contains the size of the next candle.
  • Since a harami is a secondary candle pattern, we need to confirm its signals with additional trading tools.
  • The four strategies covered in this article are applicable to other candlestick reversal patterns.

How to Practice

As with any pattern or strategy in the stock market, it takes time and effort to recognize them in real-time.

We recommend trading in a simulator with at least 20 successful attempts on this reversal pattern before employing real money in the market. The best part is that TradingSim has all the indicators you need to practice this strategy!

Once you have your dataset, you can measure your success. Then you will have confidence to take the trade knowing your ratio of wins to losses.

Bullish and Bearish abandoned baby chart pattern

We have discussed a number of candlestick patterns on the Tradingsim blog. If you haven’t checked out our other resources be sure to do so, you’ll find a really nice candlestick pattern cheat sheet to help with your training. But for today, we’ll focus on the long and short side of the Abandoned Baby candlestick pattern.

In this post, you will learn how to spot both bearish and bullish abandoned baby patterns, how to trade them, and some caveats to watch out for.

If you would like to watch a video tutorial on how to trade candlestick patterns, subscribe to our Youtube channel. Our trading expert Aiman Almansoori has put together a great webinar on the topic.

Abandoned Baby Definition

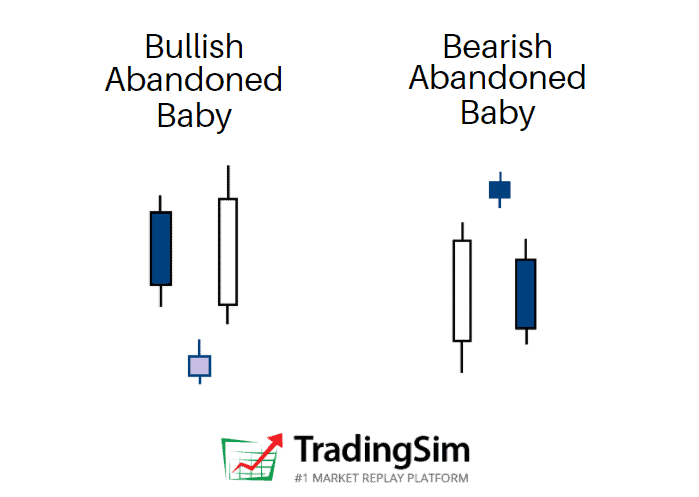
The abandoned baby candlestick pattern is a three bar reversal pattern. It is similar to the morning and evening star formations and is a very reliable reversal signal when it occurs after a sharp rise or drop. 

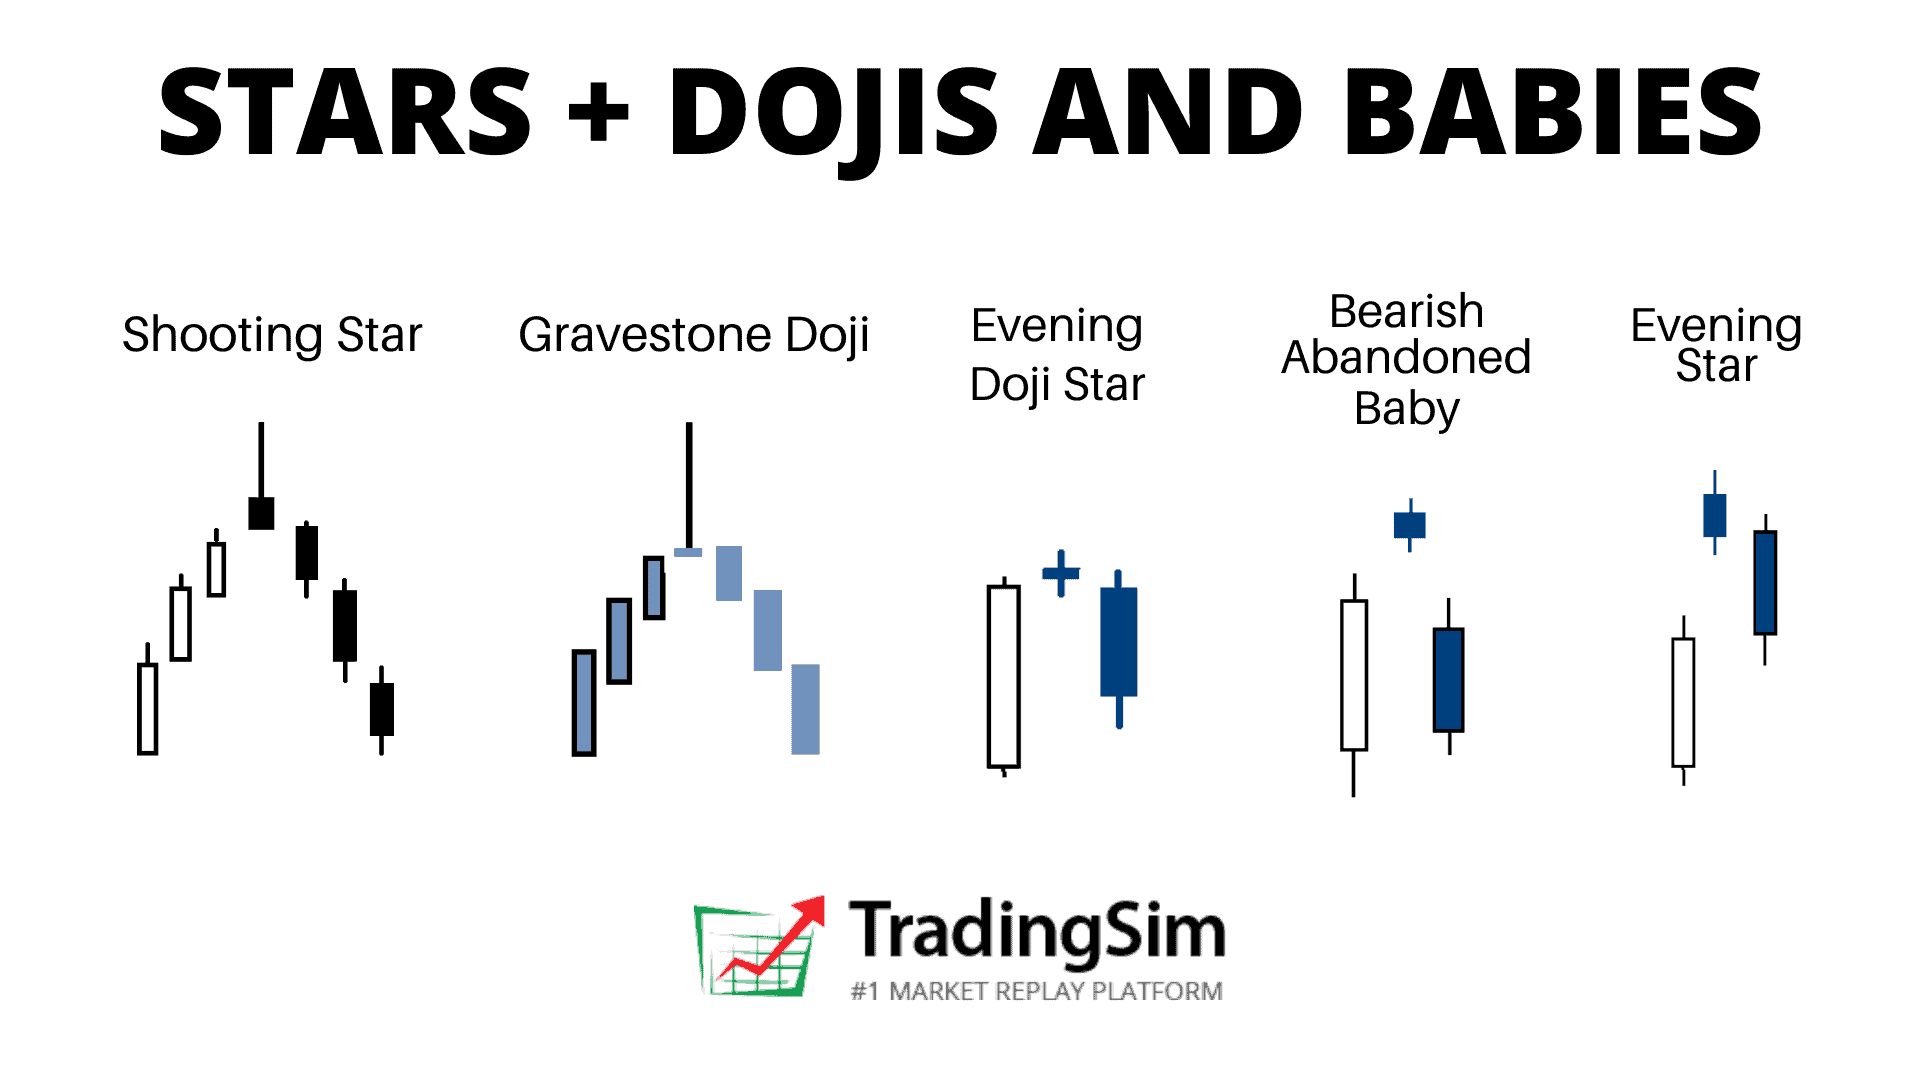
Stars, dojis, and babies candlestick patterns

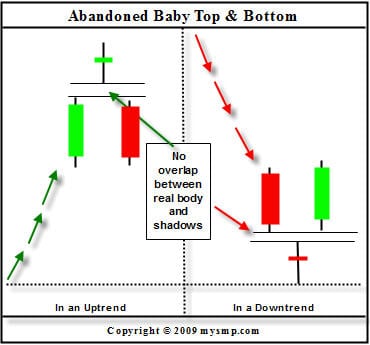
While it is very similar to the morning star and evening star, it has one key difference.  The real bodies and shadows cannot overlap from bar 1 to 2 and 2 to 3.  This makes this pattern very unique, rare, and reliable at the same time. 

Structure

  1. The first candlestick is in the direction of the primary trend
  2. The second candle is a doji which gaps in the direction of the primary trend, exhibiting no overlap with the real body or shadow of the previous candle
  3. The third candle is in the opposite direction of the first day and gaps in the opposite direction of the doji.

Despite having “baby” in its name, just as the concealing baby swallow formation, it has more in common with the island reversal pattern.

Typically, the body of the candle will be a narrow doji candle, but can also be any number of indecision candles, like the dragonfly, gravestone or others.

The Psychology

When you think of the psychology of a candlestick pattern, it is best to think about the “story” between the bulls and bears. This can really help your confidence in knowing when to take the trade and understanding the context behind the pattern.

The abandoned baby signifies a rapid shift in momentum from the bulls to the bears or visa versa. Typically, it catches the other side off guard.

For example, during rallies off the bottom of an extended downtrend, a abandoned baby bottom can be very rapid as short sellers will be forced to cover fast. 

Conversely, during declines after extended uptrends, the abandoned baby top can be just as fast as many longs sell their positions, aiming to keep most of their profits.

To that point, the abandoned baby represents a crossroads, or “indecision” at the top or bottom of a trend reversal. Within the candle is usually a lot of activity between retail buyers and institutional sellers, or vice versa. The result is typically a large amount of volume.

That volume tells us that a lot of effort went into the candle, but with little result, signaling the reversal.

Chart Example

Abandoned baby top and bottom
Abandoned Baby

In the above candlestick charting example, notice how the abandoned baby top comes in after a strong uptrend.  This leaves the bulls trapped at the top of the formation with very little time to exit their winning positions, especially if they were buying at the top

To the right of this formation is the abandoned baby bottom.  This is the exact opposite of the abandoned baby top and is often the sight of a sharp short squeeze.

Congratulations! You are now familiar with the structure and characteristics of the abandoned baby candlestick pattern. Now it is time to apply trading techniques to the strategy with real market examples.

Trading the Abandoned Baby Candlestick Pattern

Bullish Example #1

We will now review a couple of chart examples, which show the price behavior after an abandoned baby candlestick pattern.

Bullish Abandoned Baby - Trend Increase
Bullish Abandoned Baby – Trend Increase

This is the 5-minute chart of Bank of America from June 2, 2015.

There is a clear downtrend, followed by an abandoned baby candlestick pattern, which is shown in the green rectangle.

After we identified the pattern, a strong uptrend emerges and BAC’s stock price increases a total of $0.25 per share. This may not sound like much of an increase, but Bank of America is a Titanic of a stock.

With larger cap stocks, what you are giving up in profits you don’t have to worry about in terms of risk.

Bullish Example #2

Let’s now review another example of this unique candlestick pattern.

Abandoned Baby - Trend Decline
Abandoned Baby – Trend Decline

This is the 5-minute chart of Netflix from May 5, 2015.

In the chart above, we see a bearish trend followed by an abandoned baby reversal candle pattern. You can see the formation in the green rectangle. 

This time, the abandoned baby is a doji candle, which gives additional reliability to the pattern. The next candle opens with a gap from the abandoned baby, which confirms the pattern.

The followed bullish move is so strong, that even the next candle after the confirmed pattern opens with a bullish gap.

This trend reversal leads to a $3.42 price increase in Netflix.

Bearish Abandoned Baby Example

The lesson wouldn’t be complete without seeing this pattern play out bearishly.

Before the Covid Crash of 2020, the QQQ etf produced a beautiful climactic abandoned baby pattern before crashing for the next 4 weeks.

QQQ bearish abandoned baby chart

As you can see, this topping pattern occurred at the very top of an extended bull run, signaling the reversal. Perhaps the astute trader could have foreseen the crash if he’d known about this pattern?

Trading the Abandoned Baby

The good thing about the abandoned baby candlestick pattern is that if you spot it on the chart, you can trade it right away!

It is not necessary to use additional trading indicators to confirm the signal, because the pattern is pretty reliable.

This doesn’t mean that the pattern will work 100% of the time, so don’t go overboard!

Stop Loss Orders

When you trade the pattern you should always protect your trade with a stop loss order. The proper location of your stop should be or below the middle candle of the formation, depending on the direction of your trade.

Also, feel free to put the stop as tight as possible.

Profit Targets

You can always use a moving average or an oscillator to exit a trade. The other option is to rely on basic price action rules to close your profitable position.

In order to understand how this works, we’ll show you how to implement a few techniques when trading the pattern:

How to set Stop Loss
Abandoned Baby – Stop Loss

Above is the 5-minute chart of Electronic Arts from Oct 20, 2015.

After a strong price decrease, we see a candle which gaps down from the bearish trend (green rectangle). The next candle gaps up and we confirm a bullish abandoned baby.

We go long when the last candle of the pattern closes the period. Lastly, we put a stop loss order right below the lower wick of the abandoned candle as shown on the image.

EA’s stock price begins an impulse move higher and we start following the price action. Notice that the first candle from the pattern and the previous candle form a resistance area (blue horizontal line).

On its way up, EA breaks this resistance level. The price starts consolidating and the previous resistance begins acting as support (See the black arrows on the chart for reference).

The price starts increasing afterwards and breaks the high of this congestion area.

Notice that the two low wicks during the price hesitation help us build a bullish trend line – starting from the abandoned candle. The EA price tests the trend a couple more times without breaking it.

For this reason, we stay with our long position until the market closes.

In this trade, we generated a profit of $0.74 (74 cents).

Money Management when trading the Abandoned Baby Pattern

The abandoned baby candlestick pattern is one of the most reliable patterns.

As shown above, you can place tight stop loss orders when trading abandoned babies. This is because even a small contrary move will indicate that the pattern is false.

In the trade above, our stop loss was 0.42% from our entry price.  Therefore, if you were to invest $40,000 of your buying power, a false pattern will lead to a maximum loss of $168.

However, the trade was successful and lead to a profit of 1.1% which translates to $440.

Managing with Moving Averages

Let’s now review another abandoned baby trade. This time though, we will rely on an exponential moving average to exit our trade.

Identifying Profit Targets using Moving Averages
Abandoned Baby – Profit Targets

Above you see the 5-minute chart of JP Morgan Chase & Co. from Nov 3, 2015. I have placed a 30-period exponential moving average on the chart, which is the blue curved line.

The chart begins with a price decrease, marked with the red arrow. At the end of the price decrease, we see a candle gapping down. This should be a signal for us that a potential abandoned baby candlestick pattern might occur on the chart.

Entry

The next candle gaps up and we confirm the pattern with its closing – we go long!

Let’s say we have a bankroll of $25,000. Since we have a day trading account we have a maximum buying power of $100,000.

Since the bullish and the bearish abandoned baby candlestick patterns are considered very reliable, we will invest 20% of our buying power. So, we invest $20,000 in a long trade based on an abandoned baby signal.

Stop Loss

Our stop loss is set below the lower candle wick of the abandoned candle. This is shown on the image above. In this trade, the stop is -0.45% from the entry price. This way, if our trade is unsuccessful, we will lose $90 (20,000 x 0.0045).

Identifying Profit Targets
Abandoned Baby – Profit Targets

After the confirmation of the pattern, JPM stock begins increasing. JPM reaches $65.86 and starts a corrective move. Notice that the price decreases, but it finds support at our 30-period EMA.

JPM price expands and breaks the $65.86 top and shoots to $66.06. Then we see a new decrease to the 30-period EMA. The price starts crawling on the exponential moving average afterwards; however, the level sustains the pressure of the price and we notice a new bounce from the 30-period EMA.

Exit

Although the price makes more of a sideways move rather than an increase, we see a new top at $66.10. The followed price action is in a bearish direction. The JPM stock price breaks the 30-period EMA, which is our signal to exit the trade.

In this trade, we managed to catch a .71% increase in JPM.  This breaks down to a profit of $142 while risking $90.  This gives us a 1: 1.58 risk-to-return ratio. Although this doesn’t look very impressive, $142 dollars here or there can add up to a mortgage payment at the end of the month.

Although the example above only uses 20% of your buying power, you can always invest more if you have really tight stops.

In comparison to other patterns, where you sometimes risk 2%, the abandoned baby candlestick pattern does not require you to have wide stops.

Just remember: you must use a stop loss order when trading abandoned babies.  If you don’t place a stop, an unlucky trade might lead to tremendous losses, since you are leveraging your capital.

Recap

  • The abandoned baby is a three candle formation.
  • It resembles the evening and the morning star.
  • The doji candle needs to gap from the two candles which sandwich the pattern.
  • There should be no overlaps between the middle candle and the two candles surrounding it.
  • The abandoned baby is one of the rarest candle patterns.
  • A stop loss order should always be used when trading the abandoned baby candlestick pattern.
  • Stop loss proper location is at the end of the lower candlewick of the abandoned candle.
  • You can invest more than you usually invest in your deals when trading abandoned baby candle figures. There are two basic reasons for this:
    • The abandoned baby is a pattern with a very high success rate.
    • The stop loss when trading abandoned baby figures is usually placed very tightly. In some cases, you will risk less than 0.5% of your investment.
  • Two methods for managing positions are:
    • Price Action Rules
    • Moving Averages (EMA in our example)

How to Practice

We are big proponents of practicing in a risk-free environment until you are certain you understand a pattern and it’s unique trading qualities.

For this reason, there is no better way to practice than a stock simulator.

Be sure to ask yourself questions along the way, like these:

  • Is the trend in my favor?
  • Is it time for a reversal?
  • Does volume confirm my thesis?
  • Is the stock at an area of support or resistance?
  • Do multiple timeframes align with my idea?
  • What will I risk to, and where should I target for profit taking?

In time, you’ll find yourself confident in the pattern. Good luck!

Stars, Dojis and Abaondoned Baby

Candlestick patterns can have some crazy names sometimes. Stars, dojis, and abandoned babies? The Japanese were fond of naming candlestick patterns after real-life visual representations. Shooting stars, morning stars, evening stars and abandoned babies are all examples of indecision reversal candle patterns. We’ll introduce you to them in this post.

If you haven’t checked out our complete explanation of candlestick patterns, be sure to do so. In it, we cover the construction of a candlestick chart, the history of candlesticks, and common candlestick reversal patterns. It also has a link to a free cheat sheet that includes the stars, dojis, and baby patterns.

What are Candlestick Stars?

As noted above, stars are a type of indecision candle. Typically we want to trade them as a powerful reversal pattern. But as with all candlestick patterns, context is everything.

Types of Candlestick Stars

The key rule to a star is that its real body does not overlap the previous candles real body. There are several variations of the star pattern:

  • morning star
  • evening star
  • doji star
  • shooting star

The Body

Stars will typically have a small body. This is particularly important for psychological reasons which we’ll get into in a moment. But for now, suffice it to say that stars usually open and close very tightly.

The small body of a star candle

Of course, these candles can appear anywhere on a chart. With the examples below, we’ll teach you the proper context where they should appear for profitable reversal patterns.

Exhaustion Gaps

Candlestick stars gap

On a daily chart, the Candlestick Stars will typically appear with a gap at the highs of an extended run, or the lows of an extended sell off. This is the key to the reversal patterns

Candlestick Stars will typically be associated with increased volume at these climactic ends as well. This also is part of the psychology of the pattern.

Psychology of the Candlestick Star Pattern

As a star has a small real body, it represents indecision by bulls and bears.

How so?

Think about it this way:

When a stock is trending upward aggressively, strong hands and institutions will be selling into that strength. Meanwhile, retail traders may be buying here unaware that the stock is about to turn.

Likewise, because the stock is so extended, short sellers will be initiating their positions as well, adding more supply to the stock.

As all of this occurs at once, we get a star candle that can’t seem to make up its mind on moving higher or lower. A lot of activity, but not much movement in either direction. That is, until the next candle.

While the primary trend is still intact, the presence of the star is the first sign that the trend could turn. Think of it like a crossroads.

It is the second candle that will tell us whether the reversal pattern is confirmed or not.

Candlestick Star Variations

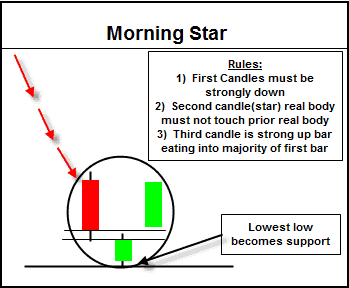
Morning Star

Morning Star

The morning star candle is a bottom reversal signal that comes after an extended downtrend.

This pattern is a three candle reversal setup. The first two bars are the typical star setup discussed above. The major difference with this pattern is the third candle in the formation.

It is a very strong green candle, which does not have to be a gap and closes at least halfway into the first candle.

Assessing the Strength of the Morning Star Signal

The further the green reversal candle closes into the first bar (the red bar preceding the star), the more bullish the formation.

On that note, outside of the morning star candlestick pattern revealing itself, look for other indications that this pattern is confirming. For example, you want to see high volume in the third candle, indicating strength.

Additionally, the morning star works very well when it occurs at previous support levels. The more criteria you can find, the better.

On the other side of the coin, if you buy a stock that prints the morning star, be prepared for some sort of pullback.

It is not uncommon for that to happen nearly 50% of the time. If there is a violation of the lows, then the morning star is failed.

Let’s take a look at the morning star candlestick at work with a live trading example.

Morning Star Trading Example

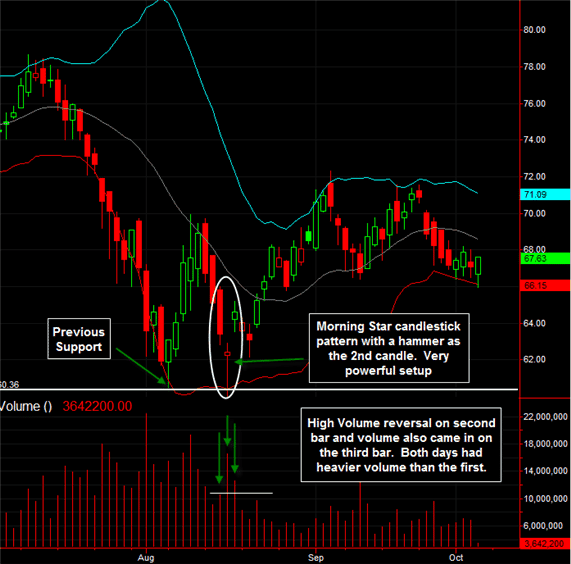
VLO Morning Star trading example
VLO Morning Star

This is a beautiful morning star setup.

First of all, the morning star came in at previous support near the 60.37 level. The star candle came in the form of a hammer.

Refer back to our Candlestick Guide to learn more about the hammer.

There was high volume that came along with the hammer, and this was an even bigger sign that this level would hold as support. The following day, the stock accelerated with a gap higher and closed well into the top half of the first bar.

As mentioned earlier, the presence of this pattern does not indicate an immediate rally. As you can see, the gap created from the second to the third bar was backfilled.

Smaller gaps, such as this one, tend to fill in the short term. Even if one had waited for the high of the third candle in morning star to be broken above, five points could have been made in that short amount of time.

Evening Star

The evening star candlestick is the bearish version of the morning star.

Evening star formation
Bearish Star Candle

It is a top reversal pattern that occurs after a sustained uptrend. The evening star is also a three candle pattern.

Evening Star Formation

The first candle is a strong bullish candle. The second candle is the star, and the third is a red body that closes well into the first candle.

Again, as with the bullish morning star, the third candle in the evening star does not have to be a gap.

Here are a couple of factors that increase the chances of this pattern succeeding:

  1. The real bodies of all three candles do not overlap
  2. The third candle closes well into the first one; preferably regaining 75% of the candle
  3. Volume should lighten up on the first candle and increase on the third.

Just as the lows of the morning star pattern provide support, the highs of the evening star candle formation serve as resistance to any further upside movement.

Doji Stars

A candlestick doji pattern is a candle that lacks a real body. This means the open and close of the bar are essentially the same. It has a strong significance after substantial advances or declines.

The lack of direction is a potent reversal signal, especially if it is followed by a candle in the anticipated direction, and at the end of a trend.

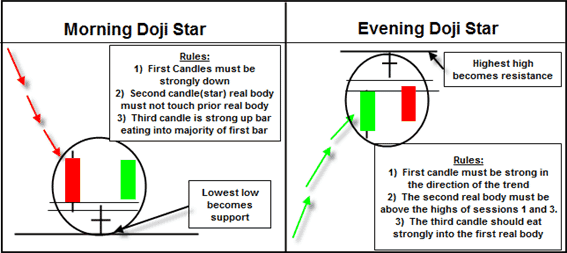
When a doji is the star within the morning star and evening star candlestick patterns, the formations are known as the morning doji star and evening doji stars.

doji star
Doji Star

Notice, the Evening Doji star image above is an abandoned baby top, while the morning doji star is not. We’ll explain why below.

Abandoned Baby Candle

Another extremely powerful version of the doji star is the abandon baby top or abandon baby bottom. This pattern is the equivalent to what some know as the island reversal.

Abandoned Baby Patterns

The abandoned baby candlestick has a doji as the second candle with a gap on both sides.

If you think about the psychology of this setup, the first gap came in an exhaustive fashion.

The stock was already in a strong uptrend or downtrend, and then it made a gap which closed near its open. This was the first sign that the directional pressure was fading.

Now, with the third candle gapping in the opposite direction of the trend, we have confirmation that a more significant trend reversal has taken place.

The Shooting Star

Shooting Star Candlestick Pattern
Shooting Star

The final star variation we will discuss is the shooting star, which occurs after a strong uptrend (or the inverted hammer that occurs after a strong move down).

The shooting star has a long upper shadow with a small real body at the lower end of the candle. This pattern usually presents itself as a sign of a short term correction rather than a more potent reversal signal.

Along those lines, it is telling us that the market’s rally could not be sustained. The market opened at or near its lows, shot up much higher and then reversed to close near the open.

The Body

Ideally, the real body of the shooting star should gap away from the previous candles’ real body. While it is not necessary, it adds confirmation to the validity of the impending reversal.

Why? Again, it all has to do with exhaustion in either direction.

Additionally, take a look at the previous candles; many times you will see overhead shadows on those candles as well. This indicates that the stock is struggling to go higher; just another clue as to what might happen.

When a shooting star forms near a resistance level, a very powerful resistance level is created.

As mentioned before, the shooting star is a short term topping formation, and any break above the high of this candle is a failed confirmation.

Variations

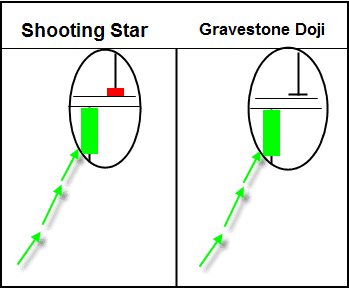
Shooting Star and Gravestone Doji

There is one variation to the shooting star you should consider; it is known as the gravestone doji. The gravestone doji is a shooting star with virtually no real body, the open and close are exactly the same.

This formation is more powerful than the typical shooting star and portends a more serious reversal.

Summary

Candlestick patterns are a great way to assess the trend of a stock. The key to its secret is the fact that candlesticks are a visual representation of price action.

These reversal candles can help the astute trader anticipate a trend change or continuation. Just remember, you need other validation points. These can come in the form of a technical indicator or other chart patterns.

How Can Tradingsim Help?

You can use Tradingsim to scan the markets and locate these candle reversal patterns. You can then apply your own trading strategy to find the optimum setups for profits.

Work on developing your own specific rules for entries, stops, and targets.

As always, be sure to ask yourself the following questions when practicing any setup:

  • what qualities work for each particular setup
  • what criteria were met, or not met
  • how was volume associated with the pattern
  • where could you have set your risk and profit target
  • how many of your trades worked or didn’t work