Chart Patterns

Learning chart patterns might be the fastest way to making consistent money in the stock market. For centuries, the market has displayed the same characteristics, over and over again. After all, it’s all about the buying and selling, supply and demand. Human emotions plotted on a graph in ticks and candles and lines and bars.

To that end, the more you learn about these repeatable patterns, the more insight you’ll have. It’s a lot like learning a new language. At first glance, it all seems like gibberish. It’s the patterns that give it meaning. For example, “love” may sound different in another language, but it means just the same.

So it is in the market. Learn the patterns of accumulation (buying), distribution (selling), and stalemate (sideways action), and you’ll be well on your way to exploiting opportunities.

In this guide to chart patterns, we’ll outline for you the most important patterns in the market: From candlestick patterns to bear traps, triangle patterns to double bottoms, we’ll cover it all.

Candlestick Patterns

What is a Candlestick?

Very simply, a candlestick is a plot of price over time. This can be any time frame. For example, a one minute candle is a plot of every traded price of a stock or asset during that one minute interval. Likewise, a 5 minute candlestick is a plot of all the prices that stock traded in 5 minutes worth of time.

This is all very basic information until you realize that candlesticks are telling a story of buyers and sellers during that timeframe.

The formation of a candlestick pattern
The formation of a candlestick

How to Read Candlestick Patterns in Trading

The value of candlesticks, which have been around for centuries, is in the story they tell. As you can see from the image above, a single candlestick shows the open, high, low, and close of the price action during that time interval.

To the naked eye, this might seem inconsequential. However, to the trained candlestick chart reader, all of that information is very, very useful in decision making. Here’s why.

Imagine a stock opens at $1 on a 1-minute candle but gets hit with a lot of selling pressure during the first quarter of the time interval. During the first 15 seconds, it trades below the opening price. This forms the lower wick of the candle.

Then, for the next 30 seconds, demand enters and the price of the stock moves higher to $1.50. It is safe to assume that bulls were able to overcome sellers during that time.

However, with 15 seconds remaining in the formation of the candle, selling pressure returns. This pushes the price of the stock back to $1.25, and forms the upper wick of the candle. Perhaps bulls took profits and bears re-entered the scene.

Bullish indecision candle

What is left is an indecision candle, which we’ll talk about later. It is a chart pattern that occurs over and over again.

Many implications can be had about this type of candle. It tells you that neither bears nor bulls are in full control. Regardless of the type of candle or implication, the point is that every candle has a story to tell. It’s also important that these chart patterns repeat, over and over again. It reveals a struggle between both forces in the market and where the stock could be headed next.

After all, it is the “hard right edge” of the chart we are always looking to anticipate. Chart patterns help us with this.

Types of Candlestick Patterns

Generally speaking there are only three broad categories of candlestick patterns: bullish, bearish, or indecision patterns. Most of these patterns require the formation of more than one candlestick to create a pattern — and there are many such patterns.

In fact, entire books have been written about all the types of candlestick patterns you can see in the market. And while they are very informative and can add value to your trading decisions, the average trader may find the myriad of patterns daunting. For that reason, most educators try to condense the types of candlestick patterns into the most popular ones.

Here are a few examples of the most popular bullish and bearish candlestick pattern combinations that you might see. Perhaps you are already familiar with a few of them?

Types of candlestick chart patterns
Types of candlestick patterns

Let’s dig a little deeper now into what constitutes a bullish or bearish candlestick pattern.

Bullish Candlestick Chart Patterns

A bullish candlestick pattern is one that implies a bullish character — simple enough, right? This could be a reversal of a downtrend, or a continuation in an uptrend.

For a single candlestick, however, we assume it is a bullish candlestick when it “closes green”. What you’re looking for is a candle that closes higher than it opens, essentially. The example we gave above is similar.

Here’s what a bullish candlestick might look like:

Bullish candlestick
Bullish or Green Candlestick

Although this could be considered an indecision candle, the overall nature of the candle leans to the bullish side. It closed higher than it opened. There are plenty of other types of bullish candlesticks more bullish than this one.

For example, a marubozu candle occurs when price opens at the lows (no/small wick) and closes at the highs (no/small wick). We usually consider these very bullish candlesticks in that bulls were in control during the entire time interval.

Notice how strong the green, bullish reversal candle is on this chart. It was enough to overcome the entire red candle preceding it — and the wicks are super tiny. This tells us demand was strong during the formation of the candle.

Bullish reversal candlestick chart pattern
Bullish reversal candles

For more examples like this one on bullish candlestick patterns, check out our guide to the 6 best bullish candlestick patterns.

Bearish Candlestick Chart Patterns

Contrary to bullish candlesticks, bearish candlestick patterns are just what you would assume. They reveal that bears were in control during the time interval that the candle pattern was formed. Likewise, they may represent a reversal pattern after a strong uptrend, or a continuation pattern during a downtrend.

For bearish candlesticks, we assume the price opens higher than it closes. In other words, bears took control at some point after the open of the candle and pushed price lower as the candle formed.

Here’s an example of what this might look like:

Bearish candlestick formation

Beyond just candlesticks, there are many bearish candlestick combination patterns. These create a series of candles which produce a bearish “event,” per se. They could be parabolic reversals, tweezer tops, abandoned babies, evening stars, or other unique patterns.

Evening star bearish candlestick pattern

Just like this example above, we discuss 8 of the most reliable bearish candlestick patterns in this tutorial.

Shooting Star Candlestick Chart Patterns

Continuing with some of the more popular candlestick chart patterns, let’s look at the shooting star candlestick pattern.

For good reason, most traders assume this is a bearish candlestick pattern. When taken in the context of an uptrend, the presence of a shooting star often signals a reversal. Many contrarian traders love to see these at the top of a parabolic run.

Shooting star candlestick chart patterns

As price increases, what you want to see is a large volume candle that starts low, goes up, and then comes back down to where it started. It leaves a nice long topping tail. This tells us that gravity, just like with a real shooting star, is pulling the price of the stock back to earth.

Traders look for these so that they can then take a short position and risk off the high of the candle, assuming it won’t go any higher.

Here’s an example of what that trade might look like:

Shooting star candlestick pattern trading example
Shooting start candlestick pattern trading example

Just as you’d expect, the shooting star occurs at the end of an uptrend, giving you an opportunity to short the stock, expecting a reversal. After the shooting star candle is formed, you initiate a short position on the break lower, risking to the high of the shooting star candle.

We discuss how to trade this setup more in depth in this tutorial.

Hammer Candlestick Patterns

Hammer candlestick patterns are somewhat similar to shooting stars in that they often signal reversals. In fact, they can be bullish or bearish depending on the context.

Hammer candlestick chart patterns
Hammer candlestick patterns

As you can see, a hammer candlestick pattern often signals a reversal of a downtrend, much like a shooting star does on the opposite end of a trend. Both hammers and shooting star candles look the same, don’t they?

In the Hammer candlestick pattern example, we have sellers capitulating into stronger hands who buy up their shares. This leaves a long bottoming wick, and signals a reversal. To take this trade, you simply buy the breakout above the hammer candle after it is formed, risking to the low of the wick.

Inverted hammer patterns can also signal reversal in a downtrend. It simply means that sellers were not able to continue pushing the stock price lower. Once they realize this, they give up and begin covering their positions, pushing the price higher.

For more on how to trade hammer candlestick patterns, check out this guide.

Doji Candlestick Patterns

Doji candlesticks are often referred to as indecision candles. They can show up red or green on a chart, but aren’t exactly considered bullish or bearish. They typically indicate a stalemate between both forces.

Doji candlestick pattern

Like the example above, what you typically find in a doji candlestick is a very narrow body with wicks on either end. Similar to what we discussed above, this informs the chart reader that both bears and bulls created a tug-of-war while this candle was forming, and neither really won, despite the candle closing green or red.

However, if you spot the doji candlestick pattern in certain contexts, it might signal a reversal. We discuss this in our tutorial on dojis. Here are a few examples of where you might see doji candlesticks, and how they differ from the large marubozo style of candlestick patterns:

Indecision candlestick chart patterns

Comparably, doji candles are narrow-bodied with long wicks. Ideally, you’ll want to wait until the next candle forms after a doji to make a decision as to who has the upper hand – bull or bears. This will keep you safe in your trading decisions.

Here is an example of a gravestone doji reversal pattern:

Gravestone doji reversal chart pattern
Gravestone doji reversal

Candlestick Patterns Cheat Sheet

In order to keep from getting overwhelmed, we created a cheat sheet for you of the most popular candlestick patterns. Ideally, you’ll keep this handy while you’re trading in order to train your chart eye.

Over time, you should expect to recognize these patterns instead of having to refer back to the candlestick pattern cheat sheet. As you see a stock becoming more and more extended, it will become second nature to you to start spotting these patterns.

Feel free to save this for your own trading purposes:

Candlestick Pattern Quick Reference Guide
Candlestick pattern cheat sheet

We’ve broken the most popular patterns into bullish and bearish candlestick patterns in this cheat sheet. We recommend taking the following approach to learning these:

  1. Pick a side (bullish or bearish)
  2. Focus on 2-3 candlestick patterns for 2-3 months
  3. Identify all the examples you can find of those patterns
  4. Document what makes the pattern work or fail
  5. Create a list of criteria you can use to stay disciplined as you trade the setups

Triangle Patterns

What is a Triangle Pattern?

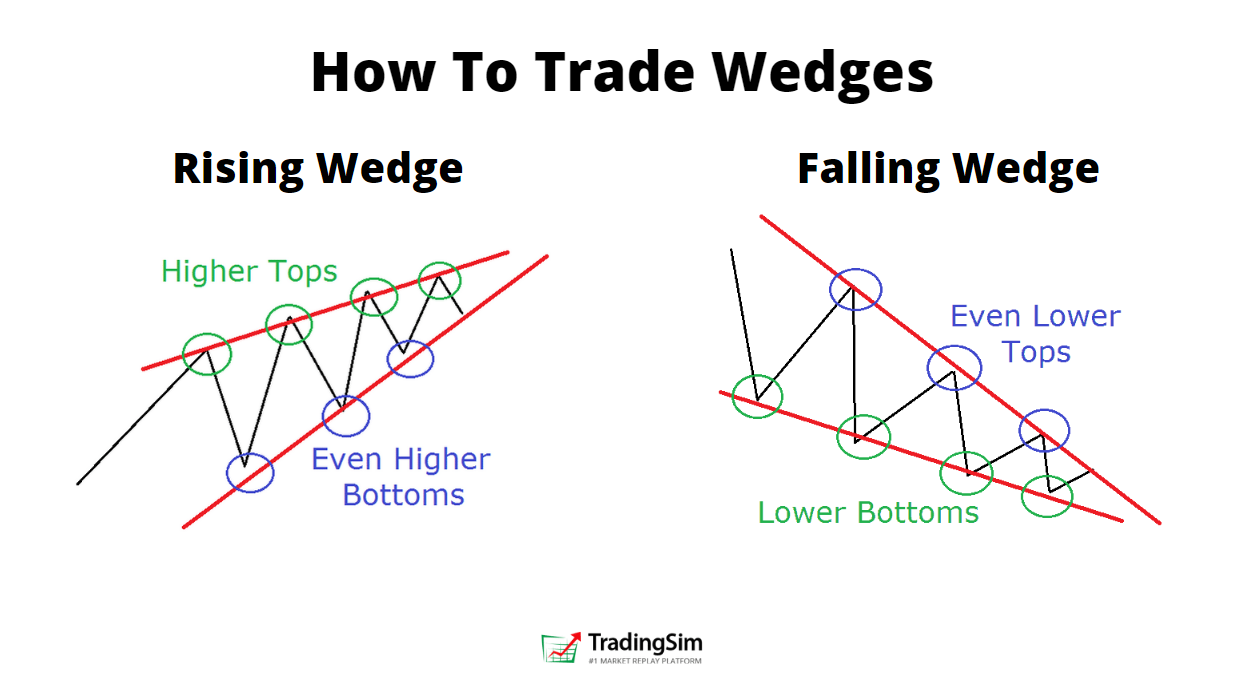
Triangle patterns are a collective of candles that form a general chart pattern over time in the formation of a triangle. They can be ascending triangles, descending triangles, or symmetrical triangles.

For all intents and purposes, the simple way to spot one of these is to draw a trend line across the top and bottom of the most recent price action of the stock in play. If you find that stock coiling into an apex, it is likely forming a triangle pattern.

These can be called by different names. Some like to call them pennants, others like to call them wedges. Aside from maybe a few nuances here or there, they are all basically the same — chart patterns that resembles a triangle.

Triangle chart patterns
Triangle patterns

How to Read a Triangle Chart Pattern

Triangle patterns begin with broader price range and volatility. Over a period of time, they contract into an apex on lower volatility and narrowing price range. This is accompanied with a series of higher tops and higher bottoms, or lower tops and lower bottoms or a symmetrical sideways pennant of lower highs and higher lows. Some variances to this can occur, like a flat base or flat top.

Regardless of the formation specifics, the goal as a trader is to determine the path of least resistance once the stock leaves the formation. Along those lines, we typically see ascending triangles resolve downwardly; descending triangles usually resolve upwardly.

Volume and price action are also key in how to read a triangle pattern. Every chart pattern should tell you a story, much like candlestick patterns. Are bulls absorbing downward pressure in a descending triangle? Or, are bears selling to the bulls in an ascending triangle?

Each pattern will show you, if you look intently enough, the path of last resistance on the horizon. Once you spot it, the triangle pattern gives you a great risk to reward setup for your trade plan.

Let’s look at each type of triangle pattern a bit more in depth.

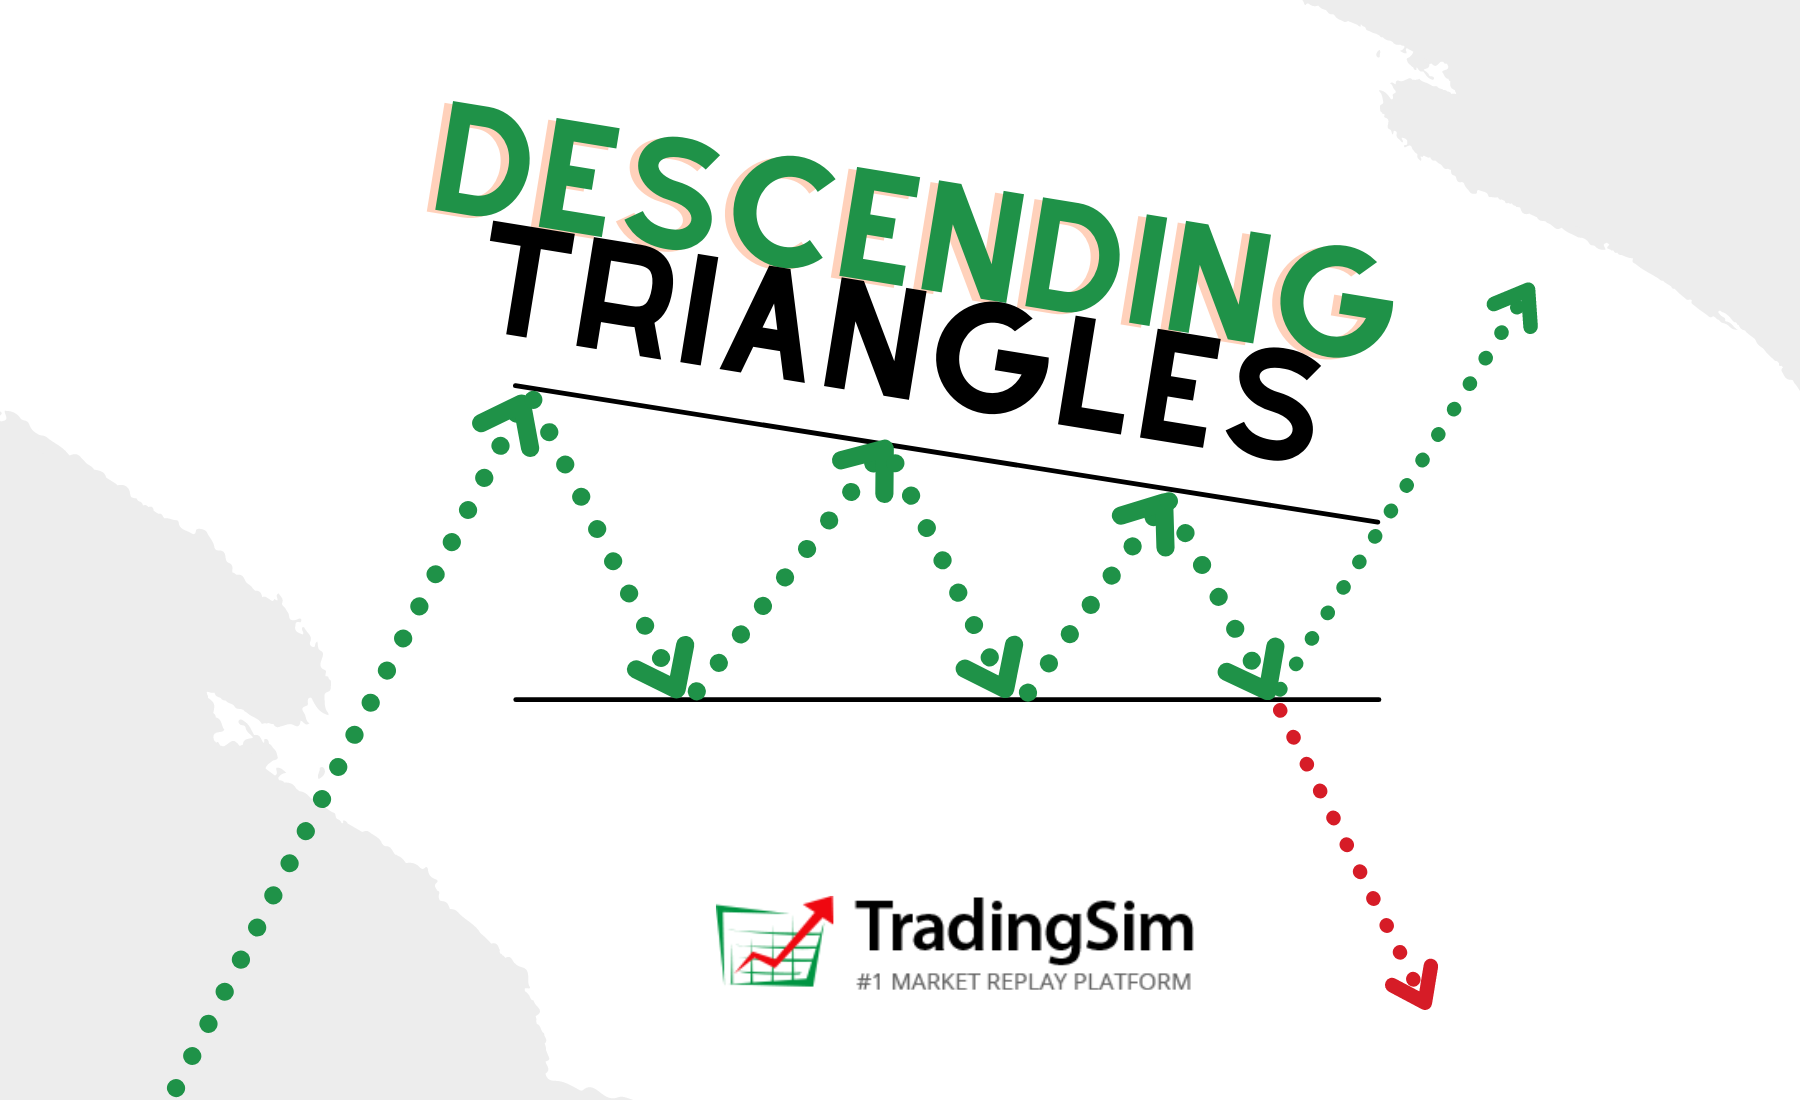
Descending Triangle Patterns

The descending triangle pattern is one of the most recognizable chart patterns in trading. It usually forms as a reversal at the end of a down trend or as a continuation pattern in an uptrend. It offers a chance for bulls to reload after profit taking in a stock.

Descending triangle patterns

Often labeled a descending wedge, it is important to note that the stock can resolve in either direction, up or down. For that reason, it’s always best to respect your stops. However, it is generally assumed to be a bullish pattern.

In our tutorial on descending triangles, we teach you a handful of ways to trade this pattern. One of the most popular is the breakout strategy. In this strategy, you wait for the stock to put in a series of volatility contractions, then buy on the breakout of the upper trend line.

Descending triangle pattern breakdown
Descending triangle breakdown

As shown in the example above, you’ll want to measure the broadest part of the triangle, and then set that as your target distance once you overlay from the point of breakout. Your stop would be below the most recent low of the pattern.

Ascending Triangle Pattern

Ascending triangle patterns can also resolve in either direction. Just like it’s descending counterpart, you always want to respect your stops if you are wrong on the trade. However, ascending triangle patterns are generally accepted as a bearish pattern.

Ideally, what you will want to see is a series of higher lows forming in the stock. In order to take a bearish stance, we recommend looking for elevated selling pressure as the stock makes new highs in the formation.

Once the stock reaches its apex and selling has done its job, look for a breakdown entry through a signal line or lower trend line.

Ascending triangle pattern breakdown

In the example above, notice how as the stock advances, selling pressure prevents it from putting in a new high. It’s akin to “walking the plank.” The end result is inevitable, it just takes a little time to get to the end of the plank.

For entries, take your position on the breakdown, risking the highs. Targets can be set at the lows of the structure, or by measuring the broad part of the triangle and applying it to your breakout point.

Symmetrical Triangle Patterns

Symmetrical triangle patterns are a lot like pennants. As the structure forms, you expect to see higher lows and lower highs. This contracts into an apex formation. However, unlike the ascending or descending triangles, it may be a bit harder to predict the direction of least resistance at first. Sometimes they can seem a bit 50/50 in nature.

Similar to the volatility contraction pattern we discuss in our best small account strategy, it can lead to big gains under the right circumstances. Here are a few chart examples of what to look for in a symmetrical triangle pattern.

Symmetrical triangle false breakout

In this example we have a false breakdown. As you can see, it is sometimes difficult to judge such a tight pattern. However, as the pattern evolved and reclaimed, you could flip your bias and risk off the most recent low for a long trade.

Here’s an example of managing your risk and setting your targets for the symmetrical triangle pattern:

Symmetrical triangle chart pattern breakout
Symmetrical triangle pattern breakout

In this example we measure the widest part of the triangle and apply it to our breakout in order to set our 1st target zone.

For more advanced early entry techniques, take a look at our explanation of VDU and Pocket Pivots for this strategy.

The Double Bottom Pattern aka the W Pattern

Trading the W pattern, or the double bottom, can be very lucrative and give you a definable area to risk off of. It is one of the more highly recognizable chart patterns in stock trading. After all, who doesn’t know what a “W” looks like?

What is a W Pattern / Double Bottom?

The W pattern is a consolidation pattern where a stock essentially retests a support area twice. Hence the “double bottom” name associate with the pattern. Usually you’ll find this pattern as a pause in an uptrend, or as a bottoming pattern in a downtrend.

Double bottom chart pattern

The double bottom signals to potential traders that the stock is having a hard time making new lows. As a result, long-biased traders may take advantage of the opportunity by buying the stock and risking off the support of the “W”.

It’s also fair to mention that if you are familiar with the double top pattern, this is essentially the mirror image of that strategy. We discuss this strategy in depth in our tutorial here.

How to Read a W Pattern / Double Bottom Chart Pattern

There are many different schools of thought on how to read a double bottom, but we think it best not to overthink it. Some educators like to see the second dip of the “W” slightly undercut the first dip. Others may not require this. At the end of the day, what you’re looking for is a support area to form, whether the second dip is lower or not.

Ideally, you want to see volume peak as the W pattern bases along the two “troughs” of the pattern. What this tells us is that weak hands are selling here, while stronger hands are absorbing their shares and supporting the stock. This will likely lead to higher volume along the lows.

As the second trough of the double bottom forms, it should immediately be on your radar. You might also look for longer term support from any prior high volume bars from prior high volume days. These are often footprints of larger position holders who may decide to support their position here. We discuss this in a recent podcast episode on the Simcast regarding vwap boulevard.

Trading the Bullish W Pattern / Double Bottom Chart Pattern

For obvious reasons, the double bottom is considered a bullish chart pattern. There are never 100% certainties in the markets, however. And that is why it is always best to implement stops, and respect them!

Let’s look at an example of where you could enter a bullish double bottom pattern in this chart of PLTR recently.

PLTR intraday double bottom / W pattern

Notice how the stock has a sharp pullback into the 12:00pm hour. Like we mentioned above, we want to see volume increase as the stock pulls back into the first trough of the W pattern. This example didn’t let us down. We got a nice long bottoming wick and elevated volume in the first trough of the “W”.

Then, as the stock forms the second trough, we get a slight increase in volume again along the lows. Only this time, less selling pressure enters the market than the first time. As supply dries up, we see the stock rocket away from this demand zone. The second pullback was a classic retest of the support in the first trough.

Our first entry could be on the diagonal trend line drawn across the top of the bullish double bottom pattern.

Applying stop out and target areas to double bottom patterns

Once you enter the stock, make sure your trade plan includes a proper stop. In this case, we put our stop below the most recent W pattern trough. Then, we measure the depth of the W and apply that to our breakout entry to get a potential target.

In this example we reached our target of $12. A $0.30 correction gave us a $0.30 profit, with only $0.13 risk from our entry. Not bad!

Bearish W Chart Pattern / Double Bottom

There really isn’t a “bearish” double bottom, per se. There is only a failed doubled bottom. Unless, of course, you want to play the bearish counterpart to the double bottom pattern, which is the double top.

Failed double bottoms typically look like bear flags. The W turns into an “M”, in other words, and kind of looks like this:

Failed double bottom pattern

On the other hand, if you’re looking for a topping pattern, the double top is a great strategy to add to your arsenal. Much like the double bottom, a bearish double topping pattern fails after a retest of the highs. Ideally, you’ll take the trade short on the break of the signal line, setting your stop at the high of top #2.

Double topping pattern
Double topping chart pattern

This is another example from PLTR. As the stock runs up, it is clear that selling pressure is present given the amount of wicks on the candles. After the first sign of weakness, PLTR makes a failed attempt to set new highs in Top 2. This traps breakout buyers and then the bid is pulled. The path of least resistance is obviously downward from then on.

Like our double bottom pattern, we would initiate a position on the break of the red signal line, set our stop at the highs, and measure the move for a potential target zone.

More can be found on this setup in our W pattern guide found here.

Golden Cross Chart Patterns

The golden cross is a bit unlike some of the chart patterns we’ve already mentioned in that it requires two moving averages. In fact, you could almost trade without candles using this chart pattern, though we don’t recommend doing that.

Golden Cross Banner

What is a Golden Cross Stock Pattern?

A golden cross occurs when a stock’s faster moving average crosses a slower moving average to the upside. For this reason, golden cross stocks are usually found after they have been in a correction for a while. There is also a very specific set of moving averages involved in this strategy.

The golden cross occurs when the 50 period moving average crosses above the 200 period moving average. This is typically seen on a daily chart, but it can also be found on smaller time frames like the hourly, 30-minute, or even intraday 1, 2, or 5 minute charts.

It signals to trend followers that the current correction in a stock or the market could begin a new uptrend.

How to Read the Golden Cross in Stock Trading?

In order for a golden cross to occur, the 50ma must — obviously — be trading below the 200 moving average. To that end, you expect to see this happening in the context of a downtrend. Price is trading lower than it was 200 days ago. And along those lines, the faster 50ma will be below that longer time frame average.

When the cross occurs, it signals to investors that momentum could be shifting. Couple this with other chart patterns like the double bottom we mention above, and you may find even more confirmation for your strategy.

Ideally, you’d like to see the speed of upward movement on the shorter time frame overtaking the longer time frame’s rate of change. When this occurs, it may be time to buy.

That being said, there are three stages of a golden cross that you should understand.

Three Stages of a Golden Cross Stock

Stage 1

In stage 1 of a golden cross, we have a downtrend. On a chart, you’ll want to see your 200 moving average trending clearly downward, along with the 50 moving average. However, the 200 moving average needs to be above the 50ma on the chart.

Here is an example with AMC. AMC was in a clear downtrend before all the hype about the squeeze occurred in 2020/2021. Before the cross occurs, we would consider this stage 1. In Wyckoff methodology, the down trend is losing steam during this stage, and preparing for a potential reversal of trend.

AMC 200 and 50 moving average stage 1 golden cross

As you can see, we have the 200 simple moving average in black trading above the red 50 simple moving average. However, if you pay close attention to the chart, you’ll notice that AMC began to slow it’s downward progression and tested a “cross” before the real golden cross occurred in early 2021. This is stage 1 of a golden cross stock.

Stage 2

This is the crossover stage. Once a stock recovers from the downtrend, puts in a consolidation and gives institutions time to accumulate shares, it is time to mark the price of the stock up again! As part of this process, the trending 50 and 200ma will eventually cross as the new uptrend begins.

Here are those stages again using AMC as our chart pattern:

The three stages of the golden cross chart pattern
The three stages of the golden cross

Notice that AMC rockets higher in price before the golden cross occurs. This send the faster moving 50ma closer and closer to the 200ma.

In our circled annotation on the chart, you would have actually got a very nice buyable pullback if purchasing based upon this strategy. The launch was enough to make the cross, and the pullback gave you a great entry. Once the stock made a golden cross, it really never looked back before launching yet again in June of 2021.

Stage 3

Stage 3 is the new uptrend phase of the golden cross stock pattern. Once the 50 moving average is trending above the 200 moving average, you expect it to remain that way for some time. Take for instance this example of a golden cross in TSLA:

Golden Cross chart pattern Example
TSLA Golden Cross Example

TSLA’s golden cross in 2019 lasted until July of 2021 and resulted in an over 1000% increase in price by the time the 50ma crossed back below the 200ma. That’s a massive gain! Obviously, this won’t happen all the time, but it goes to show that a solid trending environment with a strong stock can create a really lucrative golden cross pattern.

That being said, the golden cross strategy lasts only as long as the 50ma crosses above and stays above the 200ma. For this reason, you may get false signals in the early stages of the new uptrend, or along the way depending on how strong the uptrend is.

Golden Cross Cheat Sheet Signals

Golden cross cheat sheet

Although the golden cross pattern is pretty straight forward, here are a few examples for you to use as a cheat sheet when trading.

You need to know that the opposite pattern of the golden cross is the death cross. In an uptrend, the 50 moving average crossing below the 200 moving average is a signal to longer term traders that the trend might be changing in the opposite (bearish) direction. It becomes your sell signal.

Here is an example of using this strategy to complete your golden cross trade:

Golden and Death Cross Buy/Sell Signals

Although you wouldn’t have timed the top of CMG in this example, it is clear that you would have gotten the “meat of the move” from the original buy signal. Hopefully it is clear that a solid trending environment works best for this chart pattern.

There are some caveats and other ways to manage your position, like trendline breaks, or selling at prior resistance levels. However, if you want to stay true to the trend following strategy, you’ll buy on the golden cross and sell on the death cross.

For more information on trading this strategy, be sure to read our in-depth post on golden crosses.

Bear Trap Chart Patterns

Bear traps may conjure images of famous fur trappers and mountain men like James Beckwourth or Jedidiah Smith, but these men weren’t as deadly to brokerage accounts as bear trap chart patterns are.

What is a Bear Trap in Trading?

As a short seller, the market presents a peculiar risk. Your losses are much more magnified and exponential on the short side. This creates a vulnerability in certain situations that bulls can take advantage of.

Think of it this way. If you buy a stock at $10 and it goes to $0, you’ve lost your entire investment. However, if you short a stock at $10, what if it goes to $30? Not only have you lost your original investment, you’re now in debt. This little aspect of short selling can often create trigger happy short sellers who are willing to cry uncle when their positions go against them.

On that token, when heavy pocketed bulls know that shorts are digging into a position, they may support the stock in an effort to “squeeze” the shorts above their high water mark. Once this happens, short covering can fuel a stock price higher, giving bulls the liquidity they need to sell their positions.

But, first, the bear trap must be set.

How to Read a Bear Trap Flag Pattern

There are a lot of reasons behind what causes a chart pattern, but a bear trap is pretty simple. The reason is to trap short sellers. And like any other chart pattern, it takes a lot of pattern recognition to spot this setup.

Here are a few things you want to look for in order to read a bear trap flag pattern:

  1. The setup should look like it is about to break down. Ideally, you’ll want a nice run up — perhaps even parabolic in nature. The flag should then look like one of the triangle patterns we mentioned before.
  2. As the stock slowly bounces and contracts into the flag, you want to see the break down. This sets the hook for bears. Like the symmetrical triangle pattern, you want bears chasing the stock down.
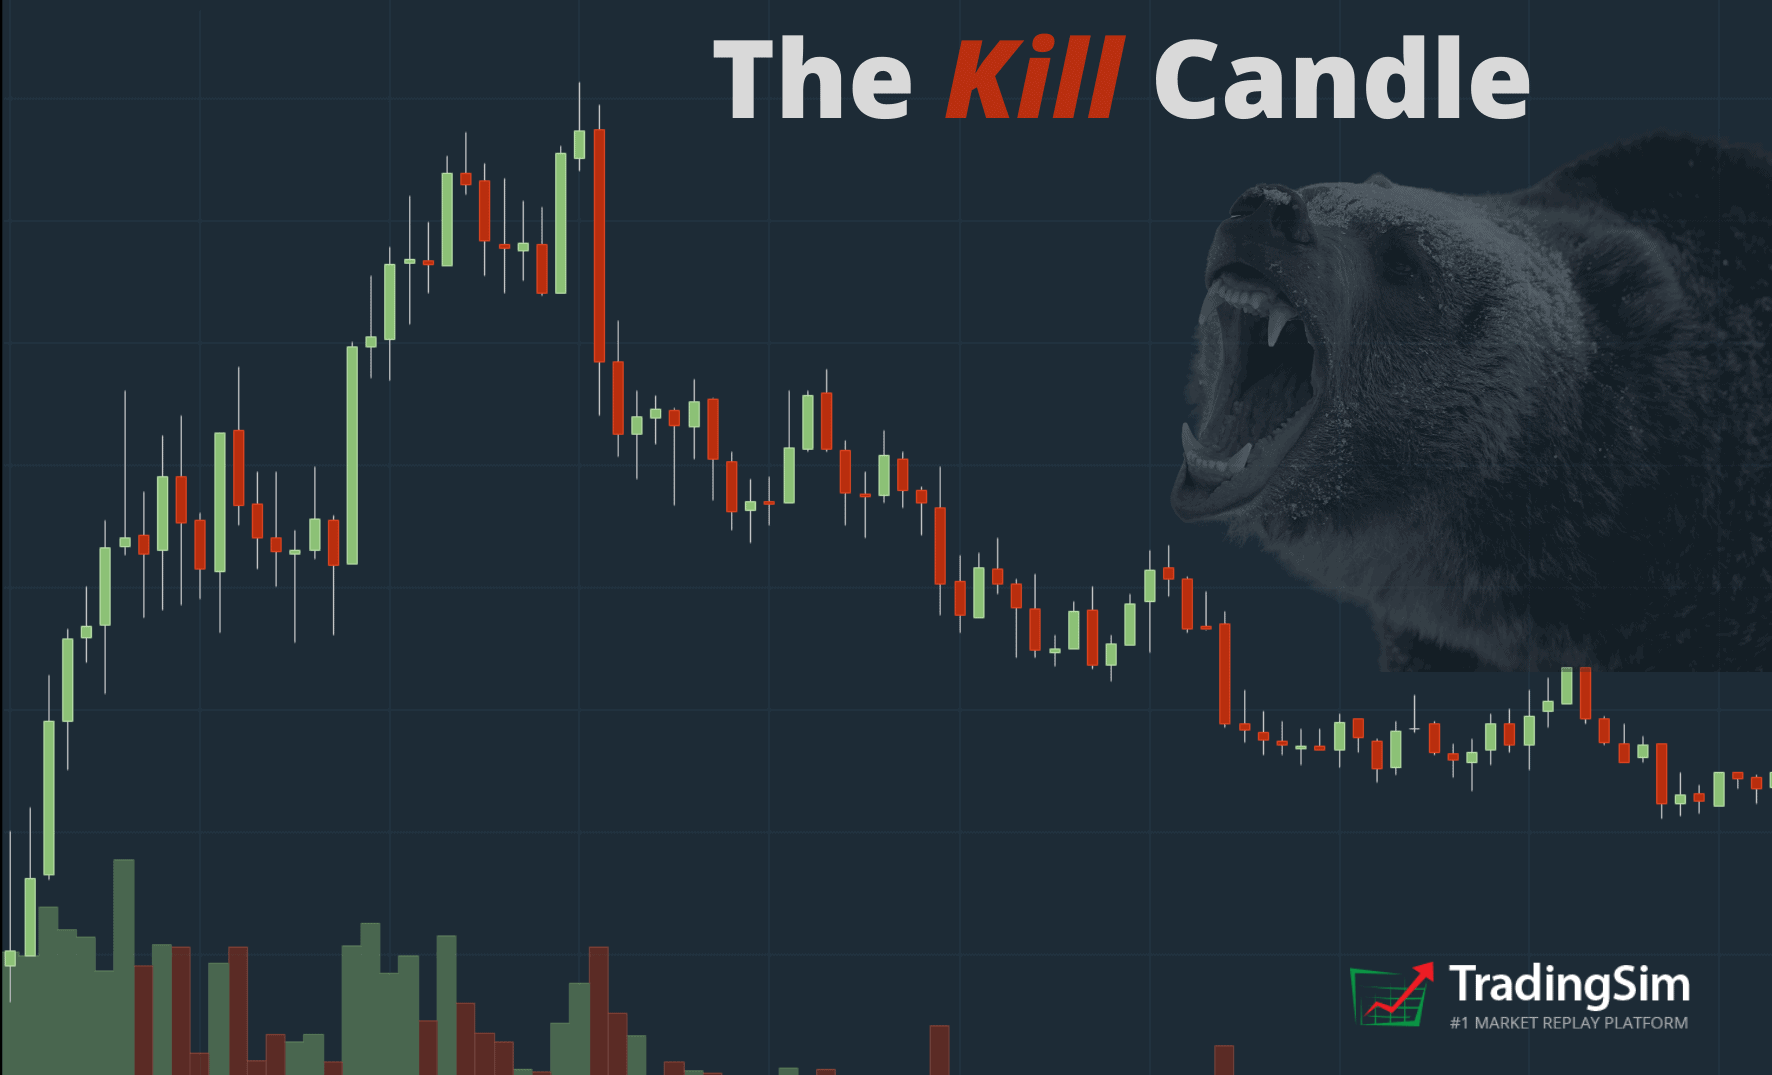
  3. Absorption or soaking action. Now that bears feel like they are firmly in control, you want to see the stock stall. Ideally, this will occur after a high volume kill candle and near or below a prior support level.
  4. Reclaim and rally. After the kill candle, if the stock isn’t dead, you better watch out. This is usually where the carnage begins for bears who were confident that the stock was dead.

Bear Trap Cheat Sheet Examples

Now that you know what to look for, let’s visualize this with some real-world examples of bear traps in trading.

Example 1

The first example is a failed breakdown of stock SOLY. This stock was a lower float, lower priced stock that had run up considerably intraday. After chopping around on heavy volume mid day, we saw a huge kill candle form. This was an ideal 1-3pm Bloodbath setup, but as you can see, the stock selling pressure was absorbed.

SOLY Bear Trap chart pattern example
SOLY Bear Trap

As SOLY began trading lower than the 11-1:30pm trading range, it retested the underside of that key level. From that point, the stock reclaimed the trading range and never looked back. In other words, bulls saved the stock and trapped the bears. The rest of the day, bears did their best to mitigate their losses by covering and fueling the stock price higher.

To trade this, you want to set a trendline at the lows of the trading range that broke down. IF the stock reclaims 50% of the kill candle, take your long position and risk to the most recent lows.

Example 2

In this example, we’ll point out a popular personality on Twitter who goes by AllDayFaders. He’s recognized the traps often over the years and explains them well in this thread:

As you can see, it is better to wait for the failed retest if you’re a short biased trader.

Example 3

Often times, if you can combine multiple strategies, it will help your odds of success.

In this 30m chart of Google, we see a bear trap combined with a hammer candlestick pattern. This gives us clear evidence of an impending reversal after a failed breakdown.

Bear Trap and Price Action Trading
Google bear trap and hammer candle

Not only do we get a hammer candle reversal, but it comes on the heels of a descending triangle pattern as well. What better way to combine as many chart patterns as possible in order to create your trade thesis. And that’s exactly what you should be doing. Combining chart patterns and elements of trading together only increases your chances of success.

If you’d like to learn more about the bear trap stocks pattern, please visit our detailed tutorial here.

Chart Patterns Summary and Cheat Sheet

As you can see, there are many different types of chart patterns in the stock market. We recommend taking your time while educating yourself with many of the resources we’ve listed here. Keep in mind that successful trading is a marathon, not a sprint.

Not all chart patterns will work for you. For that reason, we always preach risk management. Learn to be wrong when the market doesn’t go your way. It will save you the headache and heartache of big drawdowns in your account.

For more information on chart patterns, check out many of the resources here at TradingSim.com. Also, be sure to sign up for our 7-day free trial and practice these chart patterns in the simulator with no risk! We’ll leave you with this chart patterns cheat sheet of many of the more popular chart patterns.

chart patterns cheat sheet

The head and shoulders pattern banner

The Head and shoulders pattern is a reversal trading strategy, which can develop at the end of bullish or bearish trends. It is often referred to as an inverted head and shoulders pattern in downtrends, or simply the head and shoulders stock pattern in uptrends. In theory, they foretell the slowing momentum in either direction as the stock is unable to put in further highs or lows.

Traders like to trade head and shoulders patterns as the price targets are very predictable and the formation has an overall high success rate.

What do Head and Shoulders Chart Patterns Look Like?

The head and shoulders chart formation consists of three peaks, which develops after a strong bullish trend. The first and last peak are approximately the same height and are classified as the shoulders.

The second peak is the highest of the three and is classified as the head of the pattern.

Head and shoulders charts represent the transfer of power from the bulls to the bears in a topping pattern. In essence, it is a distribution pattern. Bulls who were buying the breakout (head), provided the liquidity for larger players to sell into, thus bringing the stock back down.

Please see the below illustration of a head and shoulders pattern top:

head and shoulders topping pattern
Head and Shoulders Top

What Do Inverse Head and Shoulders Chart Patterns Look Like?

Conversely, the inverted head and shoulders pattern is the head and shoulders bottom.

Instead of peaks, there are troughs. This reversal pattern develops after an extensive bearish trend and represents the transfer of control from bears to the bulls. Like the topping pattern, here bulls are using the breakdown as an opportunity to go long at lower prices. It could also give longer term bears the liquidity to cover their positions.

Below is an illustration of a head and shoulders bottom:

head and shoulders bottom
Head and Shoulders Bottom

This is an outline of the inverse head and shoulders pattern. As you see, it is the mirror image of the head and shoulders topping pattern.

Identifying the Neckline in a Head and Shoulders Pattern

Every technical chart pattern has a trigger line, which provides confirmation for entering or exiting a trade.

For the head and shoulders pattern, the trade signal is called the neckline.

When you think about it, this name makes sense, because the neckline is directly beneath the head and shoulders.  Get it?

When we identify the pattern on the chart, the first thing we should do is to draw the neckline.

So, how do we draw the neckline?

The proper way to set up your neckline is to connect the two peaks or troughs (depending on if it’s a top or bottom). Here’s an example with $CEI:

$CEI head and shoulders pattner example
$CEI head and shoulders pattern example

Please note the neckline isn’t always flat.  If the peak or trough values are slightly different, then the neckline could have a slope.

We’ve tried to give you two examples of an early entry “Neckline A” and a later “Neckline B”. Both would work. It will depend on you and your style to outcome test head and shoulders chart patterns for the best entry.

What do Head and Shoulders Stock Patterns Foretell?

To determine the size of the formation, you should first set up the neckline as we just discussed.

Then, you take the mid-point of the neckline and draw a vertical line connecting the mid-point of the neckline to the top of the head. The distance between the neckline mid-point and the head is the distance we expect the stock to run after breaking through the neckline.

Please note, measuring price targets for head and shoulders and inverted head and shoulders will mirror each other. Again, the only difference is the formations are inverted.

How to Trade a Head and Shoulders Chart

When should you open a position?

When you identify the formation, you should start looking for the signal you need in order to enter the market. This signal is the moment when the price breaks through the neckline, for all intents and purposes.

When the neckline is broken, you should open a short position for head and shoulders tops and a long position for head and shoulders bottoms.

Granted, this is the old-school way to trade the pattern. Educators like Gil Morales teaches you to short into the pops on the right shoulder. He likes to find weaknesses into the overhead moving averages for good risk/reward.

If interested, he has a great book on short selling called Short-Selling with the O’Neil Disciples: Turn to the Dark Side of Trading.

Where should you place stop-loss orders?

This is a tricky question as traders’ opinions are pretty controversial regarding stop loss placement for the pattern.

Some traders claim that the stop loss should be loose and placed just above the head of the pattern.

A more conservative approach used by traders is to place the stop loss beyond the shoulder peak/trough.

We prefer placing the stop loss above the shoulder, as placing the stop above the head provides a 1:1 risk reward ratio. This isn’t very favorable odds.

When should you collect profits – Reverse Head and Shoulders Pattern Example 1

Again, the rule of thumb for this pattern is to determine the price target based on the depth of the pattern.

If this sounds confusing to you, have a look at the image below:

Price Target for Head and shoulders pattern
Price Target

This is a classic inverted head and shoulders scenario. This is the 30-minute chart of Apple. First, we have a bearish market followed by the creation of an inverted head and shoulders formation.

You can see the neckline – the brown line.  Once the neckline is broken to the upside, we were able to set our price target based on the depth of the neckline to the trough of the head, which is represented with the black arrow.

After we establish our long position, we place our stop loss below the last shoulder as shown in the image.

After 24 hours, our minimum target is reached and we exit the position after the first bearish candle circled in green.

This inverted head and shoulders formation brings us a profit of $2.20 per share with the Apple equity.

While we exited this position near the target, you should not exit your position if the price continues to move in your favor.

Reverse Head and Shoulders Target Example 2

Having fun? Let’s go through another example.

Reverse head and shoulders Price target example 2
Price Target

This is the 30-minute chart of Facebook.

After a strong downtrend, an reverse head and shoulders pattern develops. Again, we identify the neckline by drawing a brown line across the shoulders.

We open a long position with the first candle that closes above the brown neckline. Meanwhile, we establish our minimum target, which is illustrated with the black arrow.

After a few days, the price reaches our minimum target, but we stay with our long position until our bearish signal develops. For more information on bearish candlestick patterns as entry and exit signals, visit our guide to candlesticks.

A few hours later, a hanging man develops and we close our long position.   From this long position, we were able to generate profits of ~ $4.00 per share.

When does the Head and Shoulders Pattern Fail

Although head and shoulders are considered one of the most reliable chart patterns for equity trading, like any other chart technique – it can fail.

Sometimes, we will receive our confirmation signal and the price does not reach our minimum target.

In other cases, the price will confirm the formation by breaking the neckline, and we will see absolutely no movement in our favor. These cases are not rare at all.

head and shoulders pattern failure
Pattern Failure

This is the 60-minute chart of Toronto-Dominion Bank. After a steady downtrend, an inverted head and shoulders formation develops.

We establish the neckline, price target, and stop loss, which are best practices for identifying the formation.

Unfortunately, after opening a long position, TD Bank begins to retreat below the neckline and ultimately trips our stop-loss order.

From this position, we accumulated a loss of ~52 cents ($0.52) per share. Although all the symptoms of an effective pattern are there, things didn’t work out.

This is why it is important to respect your stops!

Day Trading Head and Shoulders Tops

The first thing to consider when day trading this pattern is that it requires time. Unless you are on sub-minute charts or tick charts, you will likely need two days worth of bars or an early afternoon set up for the formation to fully develop.

Like any other trading setup, you will need more than just the chart pattern to be a success. Some of these items include proper money management and a firm understanding of risk on each trade.

Back to an intraday example, check out this head and shoulders chart of RPM.

Intraday Top on RPM
Intraday Chart Example

You can see the setup is the same as all the other charts previously discussed, even though the chart is on a 5-minute time frame.

The key point, again, is that you will need to let the trade setup. It’s not like an opening range breakout with 4 or 6 candles after a major gap. It takes time.

This pattern requires you to let the trade come to you, which takes extreme patience. The positive is that the reward from the trade is significant because the “cause” built up before the move creates a large “effect,” typically. There are many traders on both sides of the trade placing real money on the line.

The key is, after the break of the neckline, managing the trade properly. This means placing your stop above the recent peak or trough point. Also, it means adding to the position as it goes in your favor, all while managing a core position.

Key Summary Points on Head and Shoulders Chart Patterns

  • Head and shoulders tops and bottoms are reversal chart patterns.
  • It is one of the most reliable technical formations.
  • Inverted head and shoulders can reverse a bearish trend to bullish.
  • You will need to identify the formation, neckline, and stop loss levels.
  • Open a position when the price breaks through the neckline.
  • Advanced/Early entries can be taken on pops into the moving averages on the right shoulder
  • Place a stop loss order on the edge of the last shoulder.
  • The price target for the formation is equal to the depth of the neckline to the head of the formation.
  • When the price target is met, stay with the position until a contrary signal develops.
  • The pattern can fail, so don’t get too sure of yourself.
  • Use a global news source to understand the financial impacts outside of your market which can impact the trade.

How Can TradingSim Help

As with any strategy, we never recommend putting your money to work without testing the setup first. Ideally, you’ll want a set of as many simulated trades as possible in order to know your probability for success.

In other words, don’t take our word for it. Jump in the sim, scan for reversals both long and short, and track them in the analytics page. This way, you’ll know ahead of time what your realistic outcome expectancy can be.

Along the way, be sure to study which areas provide the best points of entry for your specific head and shoulders pattern strategy.

Here’s to good fills!

Rising and falling wedges banner

Rising and falling wedges are a technical chart pattern used to predict trend continuations and trend reversals. In many cases, when the market is trending, a wedge pattern will develop on the chart. This wedge could be either a rising wedge pattern or falling wedge pattern. The can either appear as a bullish wedge or bearish wedge depending on the context. Thus, a wedge on the chart could have continuation or reversal characteristics depending on the trend direction and wedge type.

In this post, we’ll uncover a few of the simplest ways to spot these patterns. Likewise, will give you the best way to predict the breakout and trade them.

What do rising wedge and falling wedge patterns look like?

Although many newbie traders confuse wedges with triangles, rising and falling wedge patterns are easily distinguishable from other chart patterns. They are also known as a descending wedge pattern and ascending wedge pattern.

Rising Wedge – Ascending Wedge

The rising wedge pattern develops when price records higher tops and even higher bottoms. Therefore, the wedge is like an ascending corridor where the walls are narrowing until the lines finally connect at an apex.

The below image illustrates the rising wedge pattern formation:

Rising Wedge Pattern aka Ascending Wedge

Note that the rising wedge pattern formation only signifies the potential for a bearish move. Depending on the previous market direction, this “bearish wedge” could be either a trend continuation or a reversal. In other words, during an ascending wedge pattern, price is likely to break through the figure’s lower level.

A Bearish Wedge Pattern

Ideally, you’ll want to see volume entering the market at the highs of the ascending bearish wedge. This is a good indication that supply is entering as the stock makes new highs. A good way to read this price action is to ask yourself if the effort to make new highs matches the result.

Along those lines, if you see the stock struggling on elevated volume, it could be a good indication of distribution.

Falling Wedge – Descending Wedge

A falling wedge pattern is an exact mirror image of the rising wedge. As a descending wedge pattern, it develops on the chart when there are lower bottoms and even lower tops:

Falling Wedge aka Descending Wedge

As you can see, the bottoms are decreasing, but the tops are decreasing at a faster pace.

Opposite to rising wedge patterns, falling wedge patterns are typically a bullish wedge, which implies the price is likely to break through the upper line of the formation. Much like our discussion above on ascending wedges, this descending wedge pattern should display the inverse characteristics of volume and price action.

Bullish Wedge Pattern

As a bullish descending wedge pattern, you should notice that volume is increasing as the stock puts in new lows. As this “effort” to push the stock downward increases along the lows, you’ll notice that the result of the price action is diminishing. This is likely due to accumulation efforts.

For this reason, it is commonly known as a bullish wedge if the reaction is to the upside as a breakout, aka a falling wedge breakout.

Predicting the breakout direction of the rising wedge and falling wedge patterns

Let’s be clear once again: rising and falling wedge patterns could result in a continuation or reversal. It all depends on the direction of the primary trend, and the context of the volume and price action.

You may be thinking, “But how is it possible for a pattern to have two very different outcomes?”

The answer to this question lies within the events leading up to the formation of the wedge.

Wedge Stock Pattern – Trend Continuation

During a trend continuation, the wedge pattern plays the role of a correction on the chart. For example, imagine you have a bullish trend and suddenly a falling wedge pattern develops on the chart. In this case, the descending wedge represents a correction. Thus, we expect a price breakout from the wedge to the upside.

The same applies for rising wedge patterns. The difference is that rising wedge patterns should appear in the context of a bearish trend in order to signal a trend continuation. Ultimately, the price action will break to the downside.

Wedge Chart Pattern Trend Continuation Example

Take a quick look at the image below, which shows how ascending and descending wedges behave during a bullish market:

Rising and falling wedge continuation patterns

As you can see from this 10-minute chart of GM, it is in a strong uptrend, which is tested a total of 9-times 9 (the blue line).

There are two falling and two rising wedge patterns on the chart.

As previously stated, during an uptrend, falling wedge patterns can indicate a potential increase, while rising wedge patterns can signal a potential decrease. Notice that the two falling wedge patterns on the image develop after a price increase and they play the role of trend correction.

Conversely, the two ascending wedge patterns develop after a price increase as well. For this reason, they represent the exhaustion of the previous bullish move. After the two increases, the tops of the two rising wedge patterns look like a trend slowdown. Hence, they are bearish wedge patterns in the short-term context.

Conversely, during a downtrend, we have the exact same scenario – price is likely to increase after a falling wedge pattern and price is likely to decrease after a rising wedge pattern. However, since the equity is moving downwards, our rising wedge pattern implies trend continuation and the falling wedge pattern – trend reversal. This is when the two types of wedges switch their roles. Yet, their behavior and potential remains the same.

Here is an example for your consideration:

Rising wedges in a downtrend

Trend Reversal

In different cases, wedge patterns play the role of a trend reversal pattern.  In order to identify a trend reversal, you will want to look for trends that are experiencing a slowdown in the primary trend.  This slowdown can often terminate with the development of a wedge pattern.

Remember our discussion earlier? The best way to think about this is by imagining effort versus result. Before a trend changes, the effort to push the stock any higher or lower becomes thwarted. Thus, you have a series of higher highs in an ascending wedge, but those highs are waning.

In other words, effort may be increasing, but the result is diminishing. This is typical of a reversal pattern.

Trend Reversal Chart Example

Bullish Wedge and Bearish Wedge Trend Reversal Pattern
Wedge Trend Reversal Pattern

Above is a daily chart of Google and a 10-minute chart of Facebook showing the exact trigger for entering a position.

Note in these cases, the falling and the rising wedge patterns have a reversal characteristic. This is because in both cases the formations are in the direction of the trend, representing moves on their last leg.

How to trade ascending and descending wedge patterns?

Every wedge strategy has a signal line. Depending on the wedge type, the signal line is either the upper or the lower line of the pattern.

For example, if you have a rising wedge, the signal line is the lower level, which connects the bottoms of the wedge. If you have a falling wedge, the signal line is the upper level, which connects the formation’s tops.

The wedge strategy is simply this: When you see a break in the signal line, you should enter the market in the direction of the break.

For example, when you have an ascending wedge, the signal line is the lower level of the figure. When you see the price of the equity breaking the wedge’s lower level, you should go short. At the same time, when you get a descending wedge, you should enter the market whenever the price breaks the upper level of the formation.

Wedge Strategy – Where should you place your stop loss?

When trading a wedge, stop loss orders should be placed right above a rising wedge, or below a falling wedge. You do not want to make your stops too tightly as the price action will often violate one of the trend lines before rebounding swiftly. Instead, you’ll want to see a real break of significance to know you need to exit your position.

Wedge Strategy – When should you take profits?

The potential price target of a wedge is equal to its size.

This means that if we have a rising wedge, we expect the market to drop an amount equal to the formation’s size. If we have a falling wedge, the equity is expected to increase with the size of the formation.

Below you will see an image showing how to trade a rising and a falling wedge:

Wedge Strategy Trading Example

This is the 5-minute chart of JP Morgan. There are two wedges on the chart – a red ascending wedge and a blue descending wedge. We enter these wedges with a short and a long position respectively.

The overall JPM movement is bullish and the two wedges show a price cycle during a bullish trend:

  • Price bounces from a trend
  • Price starts hesitating and closes a rising wedge
  • The wedge is broken and the price decreases into a falling wedge
  • Price touches the trend and the falling wedge is broken in a bullish direction
  • New bullish movement appears

The blue arrows next to the wedges show the size of each edge and the potential of each position. The green areas on the chart show the move we catch with our positions. The red areas show the amount we are willing to cover with our stop loss order.

In both cases, we enter the market after the wedges break through their respective trend lines.

These two positions would have generated a total profit of 80 cents per share by JPM.

How to practice rising and falling wedge patterns

The best place to practice any strategy is in a market simulator. We suggest flipping through as many charts of the more liquid names in the market. Get out your trend line tools and see how many rising and falling wedges you can spot. Draw them, and then make note of the price action on the breakout or breakdown, identifying what made them a bearish wedge or a bullish wedge.

While you do this, analyze the bigger picture context. For example, is the stock in an uptrend or downtrend? What do higher time frames like the 15m, 1hour, or daily chart look like? Also, what does volume look like during the pattern?

Many times, you may find that volume recedes during bearish continuation wedges, while it may increase in bearish reversal wedges.

Over time, you should develop a large subset of simulated trades to know your probabilities and criteria for success before you put real money to work.

We hope this helps, and here’s a quick summary in parting:

  • Wedges are technical analysis chart patterns.
  • Wedge patterns could be rising and falling.
  • Rising wedge patterns usually imply an impending decrease in price.
  • Falling wedge patterns usually imply an impending increase in price.
  • Wedges could be trend confirming or trend reversing depending on the previous price movement.
  • We should enter the market with the break through the signal line of the wedge.
  • Stop loss orders should be placed above the rising wedge and below the falling wedges.
  • We should aim for a target of a minimum amount equal to the size of the wedge.
  • Even if the wedge is successfully completed, we should not close our position if the equity is still trending in our favor.

The descending triangle pattern is a type of chart pattern often used by technicians in price action trading. The pattern usually forms at the end of a downtrend or after a correction to the downtrend. However, it can also occur as a consolidation in an uptrend as well.

Chart technicians can make use of the descending triangle pattern in order to trade potential breakouts.

Bearish or Bullish?

Contrary to popular opinion, a descending triangle can be either bearish or bullish. Traditionally, a regular descending triangle pattern is considered to be a bearish chart pattern. However, a descending triangle pattern can also be bullish. In this instance it is known as a reversal pattern.

To that point, the descending triangle can be viewed as either a continuation pattern or a reversal pattern. The triangle continuation pattern is your typical bearish formation. This pattern occurs within an established downtrend.

On the other hand, a descending triangle breakout in the opposite direction becomes a reversal pattern. Considered the opposite of the ascending triangle, this pattern is also known as the bearish triangle descending pattern.

A very important fact to bear in mind when trading the descending triangle is that it is very subjective. Therefore if you are new to trading the descending triangle stock pattern, you need to have a lot of practice. Familiarizing yourself with it in the simulator will allow you to build your own custom triangle trading strategies.

Characteristics of the Descending Triangle

The classic version of this pattern forms with a trend line that is sloping and a flat or a horizontal support line. The pattern emerges as price bounces off the support level at least twice. The completion of the pattern occurs after the end of a retracement in a downtrend.

The downside breakout from the support triggers a strong bearish momentum-led decline.

However, this textbook pattern seldom occurs in the real markets. In most cases, a descending triangle pattern can also see a sloping base as well. Instead of a flat support level, you can see higher lows being formed.

The illustration below shows an “ideal” descending triangle pattern, which is often labeled a descending wedge, as well.

Example illustration of a classic descending triangle pattern

Typically, the breakout from a descending triangle is triggered to the downside. The distance from the support to the first high is measured. This measured distance is then projected to the downside where the target price can be set.

However, not all descending triangles breakout to the downside. You can also see an upside breakout from the descending triangle. In this case, it becomes a continuation pattern instead of a reversal pattern.

The same concept of measuring the distance from the support to the first high is used to determine targets. This is then projected to the upside for the minimum price objective.

In the next section of this article, we illustrate five descending triangle trading strategies that can be used.

1. The Descending Triangle Breakout Strategy

As the name suggests, the descending triangle pattern breakout strategy is very simple. It involves an anticipation of a breakout from the descending triangle pattern. This strategy uses a very simple combination of trading volumes and asserting the trend, which can be used to capture short term profits.

The first step in trading this strategy is to pick a stock that has been in a downtrend or in a consolidation phase. The time frame of the chart is irrelevant as you can use this strategy across any time period. Once you have identified a stock and the time frame, wait for price action to contract.

Be sure to allow for some flexibility in charting the patterns. Simply watch for lower highs and lower lows being formed. Once you have identified this price action, the next step is to draw or chart the descending triangle pattern.

The basic premise of using this strategy is to look at volume once you’ve identified the pattern. You can typically observe that volume begins to diminish toward the end of the descending triangle pattern formation.

The chart below shows an example of the Microsoft (MSFT) daily stock chart. In the chart, you can see that the triangle pattern was formed after price action was trading sideways. After a brief consolidation, price falls lower before breaking out from the pattern.

Descending Triangle MSFT
Descending triangle pattern breakout strategy

Volumes are usually lower closer to the breakout. Once you identify the lower volume, simply measure the distance from the first high and low. Then you project the same from the breakout area which becomes your target price. We show this with the dotted lines on the chart above.

This simple volume based descending triangle pattern is easy to trade but requires lot of time to watch the charts.

2. Descending Triangles with Heikin Ashi Charts

Using Heikin Ashi charts along with the descending triangle pattern you can develop a powerful but simple trading strategy. Heikin Ashi charts visually stand out compared to the conventional chart types.

One of the main characteristics unique to Heikin Ashi charts is the fact that they can depict the trend easily. Most traders often struggle when it comes to identifying the trend. You can resolve this confusion by switching to Heikin Ashi charts.

In this strategy, traders simply need to wait for the descending triangle pattern to be formed. Once the pattern has been identified, the next step is to wait for the bullish trend to pick up. In most cases, you will find that the Heikin Ashi candlesticks turn bullish prior to the breakout. This can be used as an initial signal to prepare for long positions in anticipation of a breakout.

The next chart below shows the Heikin Ashi chart for Alcoa (AA) on the 60-minute time frame. Notice that, prior to the breakout, the Heikin Ashi candlesticks turn bullish.

Descending triangle with Heikin Ashi candlesticks

Making Price Target Projections

The projections are based on the same strategy as before. Measure the distance from the first high to the first low and project the same from the anticipated breakout level.

Wait for the breakout from the descending triangle pattern. Initiate a long position after the first bullish Heikin Ashi candlestick. Then, project the measured distance from the breakout to get the target price.

Depending on your charting platform, you will notice that volume bars also change. This is because they reflect the bullish/bearish sentiment based on the Heikin Ashi candlesticks. Volume bars serve an additional purpose to alert you to a potential bullish breakout.

This descending triangle strategy with Heikin Ashi charts is effective to trade in the short term.

3. Descending Triangle with Moving Averages

Traders and intraday speculators can also combine price action techniques and chart patterns with technical indicators. Moving averages are one of the oldest and simplest of technical indicators to work with.

It is important to note that in this trading strategy we use the descending triangle pattern to anticipate potential breakouts. Along those lines, the moving average indicators serve the purpose of triggering the signal to initiate a trade.

In the following example, we use a 60-minute stock chart for General Motors (GM). We use a 10 and 20 period exponential moving average. Traders can experiment with their own settings on the period of the moving average; this depends on the time period that you use. For example, for a daily chart time frame, you can use the 10, 20 or 20 and 50 period settings.

Also note that using small periods (less than 10) could make your moving averages more sensitive to noise.

Descending triangle with moving averages

The above chart shows the 10 and 20 period EMA applied to the chart for GM. Notice that prior to the break out, the moving averages signal a crossover buy. The moving averages can be a great source to alert you when to initiate a trade.

There is no need to make use of volumes when trading with this strategy. Also note that you will not always see a bullish signal from the EMA’s prior to the breakout. After you get a bullish EMA signal and a breakout, it is an ideal signal to trade.

Projections and target price level methods remains the same as outlined in the initial strategy.

4. The Descending Triangle Reversal Topping Pattern

You can identify the descending triangle reversal pattern at the top end of a rally. This pattern emerges as volume declines and the stock fails to make fresh highs. The pattern indicates that the bullish momentum is exhausting. At the same time, price action forms a horizontal support level.

After price bounces off the support level multiple times, posting lower highs, we can anticipate a potential downside breakout. The minimum distance that price moves prior to the breakout is measured from the initial high. This distance is projected lower after price breaks out below the support level.

The descending triangle reversal pattern can be very easy to trade if you spot the pattern ahead of the breakout.

The next chart below illustrates the descending triangle reversal pattern in play. The stock chart for Morgan Stanley (MS) shows that after a strong rally, price stalls near the highs. Notice the support level that also stands out.

The Descending triangle reversal pattern at top

The resulting bounce off the support level leads to a lower high. Following this, price breaks down below the support with strong momentum. As you can see, the minimum measure distance is nothing but the project from the initial high.

5. Descending Triangle Reversal Pattern at Bottom

The descending triangle reversal pattern at the bottom end of a downtrend is the direct opposite of a distribution event. In this case, you will find that price action stalls at the end of a downtrend. A horizontal support level marks a bottom in price.

Multiple attempts to the upside lead to lower highs. Subsequently, price action eventually breaks to the upside from the descending triangle reversal pattern at bottom. Unlike the strategy mentioned previously, in this set up, you can trade long positions.

Traders can anticipate a potential upside breakout and trade the pattern accordingly.

Descending triangle reversal pattern at bottom

In the above chart set up for Goldman Sachs (GS), you can see how price fell to the lows, establishing support. The horizontal support level holds the declines where the bounce off the support level leads to lower highs.

Eventually, price action breaks out from the sloping trend line. Measure the distance from the horizontal support to the initial high and project this distance from the breakout level. The projected distance becomes your target price level.

Tips when Trading the Descending Triangle Pattern

Subjectivity is essential when trading the descending triangle pattern. Traders who wait for the “classic” descending triangle pattern will often find themselves on the sidelines.

Familiarity and experience are the best ways to trade, and that can only come through practice.

Keep in mind that the descending triangle pattern is also know as a measured move chart pattern. A measured move chart pattern is when you measure the distance and project the same from a breakout.

Many other trading strategies can blend well with the descending triangle chart pattern. It fits perfectly well within an investor’s buy and hold strategy. The triangle pattern also works with technical analysis which can complement the fundamental analysis as well.

In conclusion, the descending triangle pattern is a versatile chart pattern which often displays the distribution phase in a stock. Following a descending triangle pattern, the breakout is often swift and led with momentum. This can lead to strong results when one becomes familiar with the trading strategies outlined.

Price action trading strategies are dependent solely upon the interpretation of candles, candlestick patterns, support, and resistance, pivot point analysis, Elliott Wave Theory, and chart patterns[1]. It is often confused with Volume and Price Analysis (VPA), where volume is interpreted with the price action to paint a clearer picture of the stock’s story.

In this post, we’ll examine a handful of the best price action strategies and patterns to help you develop your “chart eye”. We’ve also put together a short video to help with some of the advanced concepts we discuss. Please have a watch as a primer for the content below.


Overview of Price Action Charts

When looking at some traders’ charts, it can be difficult to determine if you are looking at a stock chart or hieroglyphics.  When you see a chart with too many indicators and trend lines, it is likely a trader trying to overcompensate for lack of certainty. In other words, they may not understand price action.

Here’s an example of some traders’ charts that look something like the picture below.

Too Many Indicators
Too Many Indicators

There are some traders that will have four or more monitors with charts this busy on each monitor. When you see this sort of setup, you hope at some point the trader will release themselves from this burden of proof.

Every trader has their own style, for sure. But at the end of the day, price is the final arbiter. And it would behoove all traders to learn how to read the tape.

Clean Charts

What if we lived in a world where we just traded price action strategies?  A world where traders picked simplicity over the complex world of technical indicators and automated trading strategies.

When you remove all the clutter from the trades, all that remains is the price.

To see a chart minus all the indicators, take a look at the following image and compare it to the previous one:

Price Action Trading Charts

At first glance, it can almost be as intimidating as a chart full of indicators.  Like anything in life, we build dependencies and handicaps from the pain of real-life experiences.  If you have been trading with your favorite indicator for years, going down to a bare chart can be somewhat traumatic.

While price action trading is simplistic in nature, there are various disciplines. As mentioned above, the disciplines can range from Japanese candlestick patterns, support & resistance, pivot point analysis, Elliott Wave Theory, and chart patterns[1].

From here on, we will explore the six best price action trading strategies and what it means to be a price action trader.

Price Action Trading Strategy Basics

Before we dive into the price action trading strategies, you need to understand the four pillars of the price action indicator.

  1. Candlesticks
  2. Bullish Trend
  3. Bearish Trend
  4. Flat Market

If you can recognize and understand these four concepts and how they are related to one another, you’re well on your way.

Pillar 1 – Candlesticks

Candlesticks are the most popular form of charting in today’s trading world. Historically, point and figure charts, line graphs and bar graphs were more important.

Not to make things too open-ended at the start, but you can use the charting method of your choice. There is no hard line here.

However, for the sake of not turning this into a thesis paper, we will focus on candlesticks. The below image gives you the structure of a candlestick. To learn more about candlesticks, please visit this article that goes into detail about specific formations and techniques.

Feel free to download our candlestick reference guide:

Candlestick Pattern Quick Reference Guide

The key point to remember with candlesticks is that each candle is relaying information, and each cluster or grouping of candles is also conveying a message. You have to begin to think of the market in layers.

Pillar 2 – Bullish Trend

This is a simple item to identify on the chart, and as a retail investor, you are likely most familiar with this formation.

A bullish trend develops when there is a grouping of candlesticks that extend up and to the right.

Think of a squiggly line on a 45-degree angle.

Bullish Trend Price Action

The key thing to look for is that as the stock goes on to make a new high, the subsequent retracement should never overlap with the prior high. This ensures the stock is trending and moving in the right direction. In other words, higher highs and higher lows.

Make sense?

Pillar 3 – Bearish Trend

Bearish trends are not fun for most retail traders. Shorting (selling a stock you do not own) is something many new traders are not familiar with or have any interest in doing. However, if you are trading, this is something you will need to learn to be comfortable with doing.

Bearish Trend Price Action

This formation is the opposite of the bullish trend. The trend is right the opposite: lower highs and lower lows.

Pillar 4 – Flat Market

Get ready for this statement, because it is big. In general terms, the market is in a flat trading range approximately 70% [2] of the time according to author Heikin Ashi Trader, which is the pen name of a trader with over 15 years of futures and forex experience.

Rarely will securities trend all day in one direction. You will set your morning range within the first hour, then the rest of the day is just a series of head fakes.

If you can re-imagine the charts in these more abstract terms, it is easy to size up a security’s next move quickly.

Flat Trend Price Action

Flat markets are the ones where you can lose the most money as well. Your expectations and what the market can produce will not be in alignment. When the market is in a tight range, big gains are unlikely. The main thing you need to focus on in tight ranges is to buy low and sell high.

6 Price Action Trading Strategies

#1 – Outside Bar at Support or Resistance

For those unfamiliar with an outside bar, an example of a bullish outside bar is when the low of the current day exceeds the previous day’s low, but the stock rallies and closes above the previous day’s high.

The bearish example of this would be the same setup, just the opposite price action.

Outside down day price action

Therefore, it’s not just about finding an outside candlestick and placing a trade.  As you can see in the above chart of NIO, it’s best to find an outside day after a major break of a trend.  In the NIO example, there was an uptrend for almost 3 hours on a 5-minute chart prior to the start of the breakdown.

After the break, NIO finished with an outside down day, which then led to a nice sell-off into the early afternoon.

#2 – Spring at Support

A spring occurs when a stock tests the low of a trading range, only to quickly come back into the range and kick off a new trend. According to Jim Forte, “springs, shakeouts, and tests usually occur late within the trading range and allow the market and its dominant players to make a definitive test of available supply before a markup campaign will unfold.”[efn_note]https://www.wyckoffanalytics.com/wp-content/uploads/2019/08/AnatomyofaTradingRange.pdf[/efn_note].

Volume can help when confirming a spring; however, the focus of this article is to explore price action trading strategies, so we will zone in on the candlesticks alone.

The one common misinterpretation of springs among traders is the need to wait for the last swing low to be breached.  Just to be clear, a spring can occur if the stock comes within 1% to 2% of the swing low.

Trading setups rarely fit your exact requirement, so there is no point in obsessing over a few cents.  To illustrate this point, please have a look at the below example of a spring setup.

Spring reversal price action trading strategy
Spring reversal

Notice how the previous low was never completely breached, but you could tell from the price action that the stock reversed nicely off the low. Thus, a long trade was in play.

#3 – Inside Bars after a Breakout

Inside bars occur when you have many candlesticks clumped together as the price action starts to coil into resistance or support.  The candlesticks will fit inside of the high and low of a recent swing point as the dominant traders suppress the stock to accumulate more shares.

In theory, it looks something like this:

Inside bars price action trading strategy

To illustrate a series of inside bars after a breakout, please take a look at the following intraday chart of NIO.

Inside bars price action trading strategy

This chart of NIO is truly unique because the stock had a breakout after the fourth or fifth attempt at busting the high.  Then there were inside bars that refused to give back any of the breakout gains.  NIO then went on to rally the rest of the day.

Please note inside bars can also occur prior to a breakout, which may strengthen the odds the stock will eventually breakthrough resistance.

The other benefit of inside bars is that gives you a clean area of support to place your stops under. This way you are not basing your stop on one indicator or the low of one candlestick.

This is popular strategy, and for good reason. These quick pullbacks often forecast higher price movements.

#4 – Long Wick Candles

The long wick candlestick is another favorite day trading setup. These are often called hammer candles, or shooting stars.

The setup consists of a major gap up or down in the morning, followed by a significant push, which then retreats. This price action produces a long wick. Often times, this price action is likely to be re-tested.

The reason for this is that many traders will enter these positions late, which leaves them all holding the bag upon reversal. Once they are shaken out, the counter pressure will be weak comparatively, and the stock typically goes up again. This usually leads to a push back to the high.

Let’s look at a few examples:

Long wick price action trading example 1
Long wick price action trading example 2

Are you able to see the consistent price action in these charts?

Notice after the long wicks NIO printed a handful of insider bars in either direction before breaking out or breaking down.  After this break, the stock proceeded in the direction of the new trend.

#5 – Measuring Length of Intraday Swings

Have you ever heard the phrase, “history has a habit of repeating itself”?  Well, trading is no different.

As a trader, it’s easy to let your emotions, and more specifically – hope, take over your sense of logic.  We tend to look at a price chart and see riches right before our eyes.

Well, that my friend is not always the reality. Let’s build on this thought.

In the world of trading there are often dominant players that consistently trade very specific securities?

These traders live and breathe their favorite stock.  Given the right level of capitalization, these select traders can also control the price movement of these securities.

Knowing this, what can you do to better understand the price action of securities you are not intimately acquainted with on a daily basis?

A good place to start is by measuring the price swings of prior days.

As you perform your analysis, you will notice common percentage moves will appear right on the chart. For example, you may notice that the last 5 moves of a stock were all 5% to 6%.

If you are swing trading, you may see a range of 18% to 20%.  Bottom line, you shouldn’t expect stocks to all of a sudden double or triple the size of their previous swings.

Sure, the market is limitless and can produce outlier days. However, it’s better to play the odds with the greatest chance versus swinging for the fences.  Over the long haul, slow and steady always wins the race.

Example

To further illustrate this point, let’s go to the charts.

Measure the Swings
Measure the Swings

Notice how NIO over a 2-week period experienced many swings.  However, each swing was on average $1-$2.  While this is a 5-minute view of NIO, you’ll see the same relationship of price on any time frame.

As a trader, do you think it would make sense to expect $5, $10, or $15 dollars of profit on a day trade?  At some point, the stock will make that sort of run, but there will likely be more $1-2 moves before that occurs.

To that point, if you can trade each of these swings successfully, you get the same effect of landing that home run trade without all the risk and headache.

#6 – Little to No Price Retracement

Without going to deep on Fibonacci (we’ve saved that for another post), it can be a useful tool with price action trading. At its simplest form, less retracement is proof positive that the primary trend is strong and likely to continue.

Smaller retracement
Smaller retracement

The key takeaway is you want the retracement to be less than 38.2%.  If so, when the stock attempts to test the previous swing high or low, there is a greater chance the breakout will hold and continue in the direction of the primary trend.

This is especially true once you go beyond the 11 am time frame. This is because breakouts after the morning tend to fail. So, in order to filter out these results, you will want to focus on the stocks that have consistently trended in the right direction with smaller pullbacks.

Using Time to Your Advantage

Trading comes down to who can realize profits from their edge in the market. While it is easy to scroll through charts and see all the winners in hindsight, it is much more difficult in real time. The market is one big game of cat and mouse.

Between the quants and smart money, false setups show up everywhere.

As a price action trader, you cannot rely on other off-chart indicators to provide you clues that a formation is false. However, since you live in the “now” and are reacting to directly what is in front of you, you must have strict rules to know when to get out.

With this in mind, in lieu of a technical indicator, one helpful tool you can use is time.

Just to be clear, the chart formation is always your first signal, but if the charts are unclear, time is always the deciding factor.

On a personal note, in a recent study of all my winning trades, over 85% of them paid in full within 5 minutes.

If you have been trading for a while, go back and take a look at how long it takes for your average winner to play out.

How to Protect Against the Head Fakes (False Setups)

Let’s review a few head fake examples to get a feel for what we are up against in terms of false setups.

In each example, the break of support likely felt like a sure move, only to have your trade validation ripped out from under you in a matter of minutes.

Protection

There are many ways you can protect yourself against these head fakes.

For starters, don’t go hog wild with your capital in one position. Make sure you leave yourself enough cushion. This way you don’t get antsy with every bar that prints.

Also, let time play to your favor. There is an urge in this business to act quickly. However, there is some merit in seeing how a stock will trade after hitting a key support or resistance level for a few minutes.

If you think back to the examples we just reviewed, the security bounced back the other way within minutes of raiding stop losses and trapping traders.

Where to Place Your Stops

One thing to consider is placing your stop above or below key levels. Since you are using price as your means to measure the market, these levels are easy to identify.

Another easy way to do this as mentioned previously in this article is to use swing points. A more advanced method is to use daily pivot points.

You are probably thinking, “but this is an indicator.” Well yes and no. Unlike other indicators, pivot points do not move regardless of what happens with the price action. They are essentially support and resistance lines.

So, let’s see how you can use pivot points to avoid getting caught in false signals.

Using pivot points to help with price action trading strategies
Using Pivot Points to avoid false breakdowns

Notice how the price barely peaked below the key pivot point and then rallied back above the resistance level. In order to protect yourself, you can place your stop below the break down level to avoid a blow-up trade.

Another option is to place your stop below the low of the breakout candle. Some traders such as Peters Andrew even recommends placing your stop two pivot points below. [4] This may not work for the risk averse trader, but it can work for some.

This is honestly the most important thing for you to take away from this article – protect your money by using stops. Do not let ego or arrogance get in your way.

Benefits of Price Action Trading

Price action traders are the Zen traders in the active trading world.

These people believe the human brain is more powerful than any machine.

Please do not mistake their Zen state for not having a system. The price action trader can interpret the charts and price action to make their next move.

Processing Data

For starters, there isn’t as much information to process, so you can focus on the chart action.

Secondly, you have no one else to blame for getting caught in a trap. Don’t bother emailing the guru with the proprietary trade signal that had you on the wrong side of the market.

The biggest benefit is that price action traders are processing data as it happens. There is no lag in their process for interpreting trade data.

Chart Patterns

By relying solely on price, you will learn to recognize winning chart patterns. The key is to identify which setups work and to commit yourself to memorizing these setups.

The next key thing for you to do is to track how much the stock moves for and against you. This will allow you to set realistic price objectives for each trade. You will ultimately get to a point where you will be able to not only see the setup but also when to exit the trade.

Some Challenges

Price action traders will need to resist the urge to add additional indicators to your system. You will have to stay away from the latest holy grail indicator that will solve all your problems when you are going through a downturn.

The real challenge is that it’s extremely difficult to trade purely on price. It’s not something you can just pick up and start doing right away.

You need to think about the patterns listed in this article and additional setups you will uncover on your own as stages in your trading career.

First, learn to master one or two setups at a time. Learn how they move and when the setup is likely to fail.

This, my friend, takes time; however, get past this hurdle and you have achieved trading mastery.

To further your research on price action trading, you may want to look into some courses like the ones offered at Wyckoff Analytics.

In Summary

Price action trading strategies can be as simple or as complicated as you make them.  While we have covered 6 common patterns in the market, take a look at your previous trades to see if you can identify tradeable patterns. The key thing for you is getting to a point where you can pinpoint one or two strategies.

To start, focus on the morning setups. The morning is where you are likely to have the most success. Avoid the lunchtime and end of day setups until you are able to turn a profit trading before 11 or 11:30 am.

To test drive trading with price action, please take a look at the Tradingsim platform to see how we can help.

Much Success,

Al

External References

  1. Seo, Yong. (2017). ‘Scientific Guide to Price Action Trading‘. Algotrading-investment.com. p. 13
  2. Heikin Ashi Trader (2018). ‘How to Trade a Range: The Most Interesting Market in the World‘. DAO Press. p. 7
  3. (2009). ‘Nifty Ready for Mark Up’ [Report]. Prabhudas Lilladher. p. 2
  4. Peters, Andrew. (2010). ‘Trading Pivot Points‘. Fabrefactum. p. 2
The Kill Candle

The Kill Candle.

It just sounds menacing, doesn’t it? And for good reason.

If you’ve ever been caught in one on the long side, you understand the pain.

What Is A Kill Candle?

Day trading legend Bao Nguyen, @modern_rock on Twitter as he is known, prefers to call it a death candle. His education service MyInvestingClub covers this candle in a few of his popular shorting courses.

But regardless of what you call it, death candle or kill candle, the result is bloody for bulls.

This pattern has become so notorious that professional day trader @rocketcatchnbob, who airs his trading day live to thousands of viewers, made “kill candle” t-shirts for his followers.

@rocketcatchnbob's kill candle t-shirts
@rocketcatchnbob’s kill candle t-shirts

As transparent as he is, @rocketcatchnbob admits giving up a $100k profit day, settling for $10k after getting caught in one of these red daggers — just to show how brutal these candles can be. His accompanying video is a great tutorial on what to watch out for.

Dangerous little buggers…

Yet for every kill the candle makes, there is always a short trader making a killing on the flip side. And depending on the setup and the skill of the trader, this candle pattern can actually be anticipated.

The Flip Side

As bulls were getting slaughtered on COCP at 2pm that day, someone else was profiting.

COCP kill candle tweet

Fintwit personality @team3dstocks (ADF) is known in the day trading world for his four main low float short setups. We’ll cover a few of them below.

More often than not, they’re centered around the formation of one of these kill candles.

To that point, on this infamous day in May, COCP fit the bill for his 2-3pm “Bloodbath setup.” As ADF likes to say, “it always arrives on time.”

COCP Kill Candle
COCP Kill Candle

Who knew trading could be so scary? 21% of the stock’s value gushing out in a single 1-minute candle.

Such is the world of low float, high volatility momentum trading.

But putting aside the gore, carnage and disappointment, there is a method to the madness here, as with most patterns in the market.

Our goal in this post is to highlight some key characteristics of these candles and uncover three strategies that may help you uncover significant profits if you decide to trade them.

Or, at the very least, learn to anticipate and side step the carnage.

How To Spot One

A kill candle does what you would assume. It kills the upward momentum of a trend at the very least. The best ones reverse the trend in a single candle.

Criteria To Look For In Kill Candles

  1. A large-bodied red candle
  2. High Volume
  3. Bearish engulfing characteristics
  4. Distribution leading up to the candle print
  5. (Usually) a failed breakout attempt

When we say a large-bodied red candle, we don’t mean “just any ‘ol red candle.” We mean something significant — more than likely the most bearish candle on the chart, accompanied by the heaviest (or heavy) volume signature on the chart.

It should look something like these examples:

2-3pm Selloff + Kill Candle:

Here are two examples of the end of day strategy that @team3dstocks uses often. It is also known as a “late day fade”.

COCP Kill Candle
COCP Kill Candle
LEXX 2-3pm bloodbath setup

10am VWAP Boulevard + Kill Candle

We cover this strategy in detail in a different post that is well worth your time. Another one from @team3dstocks, it has a very high success rate when all the criteria are met.

VWAP Boulevard kill candle example

Range Bound Multiple Kill Candles

Not all kill candles will work immediately, as was the case with BLRX. Keep in mind that algorithms, institutions, chat rooms, and deep-pocketed traders can “manipulate” stocks with such low floats.

BLRX Multiple Kill Candles

Sometimes you may see more than one kill candle. BLRX had multiple flushes, and they all occurred at the highs. As with any setup, if the trade recovers, respect your stops.

Kill Candles At The Opening Bell

Opening Bell Kill Candle

Kill Candles can present themselves at the open as well. Opening Range Breakdowns are a great strategy for the open and can often include a nice kill candle after buyers get stuffed.

As you can see, kill candles can show up just about anywhere. That being said, there are a few caveats when trading this strategy:

  • Kill candles are more predictable and volatile with small caps
  • Larger caps usually require some news or other impetus
  • Without hotkeys, you may have a hard time trading them

The 2-3pm Bloodbath Setup

We’ll take the time now to dig a bit deeper into the setups associated with the kill candle.

No doubt many momentum day traders have probably seen this pattern play out in the afternoon. It goes by a few different names, like “late day faders,” “2-3pm selloff,” or the dramatic “2-3pm bloodbath” popularized by AllDayFaders.

For more info on this, we have a post entirely dedicated to the strategy.

Float and Institutions

Regardless the name, there are a few criteria to consider. The most important being the float size and the shares traded. AllDayFaders notes why this is very important for the strategy:

AllDayFaders talking about late filings

According to ADF, institutions must close their positions before the end of the day, otherwise it is considered a “holding” and has to be filed.

If this is the case, then it makes sense for a proprietary trading firm, hedge fund, or insiders manipulating the float to support the bid up until the bloodbath. Once time is expired, the bid collapses and the fund walks with whatever shares it had, giving it enough time to liquidate down before the close.

It is for this reason that lower float stocks fit the criteria for the pattern as opposed to higher float, larger cap stocks which are harder to manipulate.

Regardless of what institutions are behind the stock movement, the tape doesn’t lie. We can see the footprints leading up to the dump.

What do we mean by that?

Plain and simple. Distribution.

Example

ACY Kill Candle example

In this example, we have a low float runner topping out around $16 for the high of the day. With the image we have shown, you can see that major selling pressure came in at the highs (indicated by the circles).

As the day wore on, the big players continued to prop the bid (demand) in order to make the stock look like a squeeze was imminent. Retail traders bought into the dip or covered there shorts. But time runs out, and 3:00pm and 3:11pm marked the last of the uptrend.

The big buyers walked away and the stock retraced half its value in a short amount of time.

We also like to call this “walking the plank.” A lot of the violent drops occur at the pivot line of an ascending lower channel marker. Others might call these bear flags.

For a nice video explanation on this setup, check out professional trader Nate Michaud’s YouTube clip.

The Opening Bell Setup

Kill candles that appear at the open can be great shorting opportunities. The best occur as bulls are pushing the stock higher only to be met with a wall of selling pressure.

In a recent trade on ticker CRSR, we see a perfect example of how bulls were trapped into buying a breakout at the open, only to watch the price immediately reverse.

Opening Bell CRSR kill candle.

As a trader, you can anticipate the breakdown if you are nimble with a trading platform geared for fast order-entry. The wick above the breakout line on the chart is our indication that price is stalling and distribution is flooding into the heavy buying pressure.

There is so much selling, in fact, that it overwhelms any bullish demand trying to move the stock upward. The result? A kill candle.

To learn more, MyInvestingClub does a great job explaining this type of setup with their free “Death Line” YouTube webinar.

The Chat Pump Exit

In the small world of momentum day trading, there are a lot of influencers on small cap stocks. Just as CNBC, or well-respected analysts might influence the movement of larger cap names, the small cap world has its chat rooms, social media, and other influencers.

chat room example
Example of a day trading chat room

Regardless of where the influence comes from, our goal as traders is to simply be aware of the price action on the chart.

To that point, if a chat room with thousands of retail traders is calling out buying opportunities, you can expect that with a small amount of shares available in low float stocks, you’ll see plenty of movement on the chart.

Sometimes, this can provide underlying demand for successful long plays. Other times, bears are lying in wait for the exhaustion, using the opportunity as a “liquidity event” to initiate large short positions.

And at the end of the day, it is all about who won: supply or demand.

And hopefully, there is enough meat on the bone for everyone to get a win.

Example

VCNX is an example of a stock that was being heavily pumped to its members, starting in the premarket and continuing into the regular session.

VCNX 2/19/2021 VWAP Boulevaard
VCNX Kill Candle at VWAP Boulevard

Admittedly, the bulls had a fantastic run! However, the momentum was eventually exhausted at a prior day’s resistance line we call vwap boulevard, credit to AllDayFaders.

Within seconds of the chat room moderator announcing that he was selling his remaining shares, the bottom fell out of the stock.

VCNX lost 16% of its value in 1 candle. It never recovered that day.

Other Considerations

When trading kill candles, it is important to note that volatility is at an extreme. This may not suit your trading personality or risk profile.

The candles move swiftly, as you can see, and the ability to get filled may be an issue depending on the broker and platform you trade with. Even with specialized trading tools, you may not get filled properly in such a fast-moving environment.

Along the same lines, not all of these securities will be available to short. For that reason, many professional traders use specialized brokers and trading platforms in order to locate shares at a fee.

DAS Short Locate Window

Lastly, it is important to note that these are just a few examples. As you study this pattern over time, you’ll find that the more criteria you can find to support your trade plan, the better.

Criteria like daily resistance levels, supply and demand in the Level II, psychological support and resistance, etc., can all all help you with your execution.

How to Practice the Kill Candle

As with any strategy, it is worth practicing until you can’t get it wrong.

Daytrading is risky enough as as seasoned professional. Make sure you know what you’re doing and have a plan for all of your trades.

Once you’ve created a large enough subset of simulated trades to know your success rate, then you might consider putting real money to work in the market.

Until then, stick to a risk-free environment for learning these strategies and protect your hard-earned money. Save the gambling for Vegas.